Thanks to the somewhat justifiable paranoia of most modern browsers, it’s nearly impossible to run a site without installing a third party security certificate. Try it and the end user’s browser will throw esoteric errors that lead them to believe you’re handing out the combination of their first born child’s hope chest. You can apply a self-signed certificate for development purposes, but don’t even think about self-signing production sites. The browsers will howl immediately, and at best your clients will complain. More likely, they’ll just leave and never return.
For novice administrators (and sometimes experts too), installing third party certificates is rather frustrating. I’ve been there plenty, and part of the problem is the lack of a simple step through. This guide by yours truly aims to fill that gap, and keep things simple as possible. There are more direct means if you want to get your hands dirty, but then, you probably wouldn’t need this guide. 🙂
Getting Started
Before getting started, you must purchase a security certificate from a trusted vendor. At the moment, InCommon and GlobalSign are the most popular. Once you have secured a certificate (pun intended), follow the steps below to get it installed and running on your site.
Note this guide assumes Internet Information Services (IIS) version 10 and InCommon as the certificate provider. Some steps may vary depending on version and vendor. If you are unsure, contact your vendor or leave a question in the comments below.
Creating Certificate Signing Request (CSR)
Acquiring a certificate from your vendor requires sending a CSR. Some vendors offer a tempting automated setup option. Don’t fall for that trap. Automated CSR setups have dubious reliability, and IIS is notoriously finicky about certificates. You will find it simpler and less frustrating to perform the steps yourself.
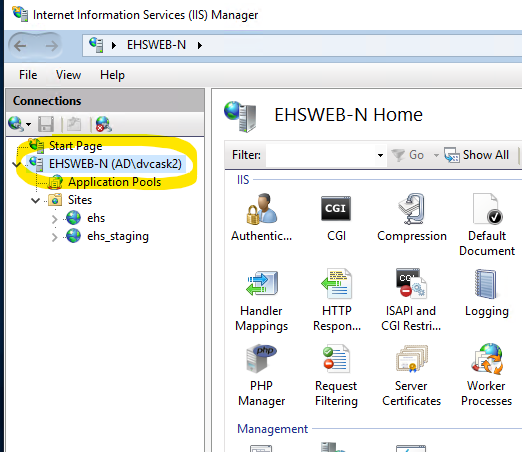
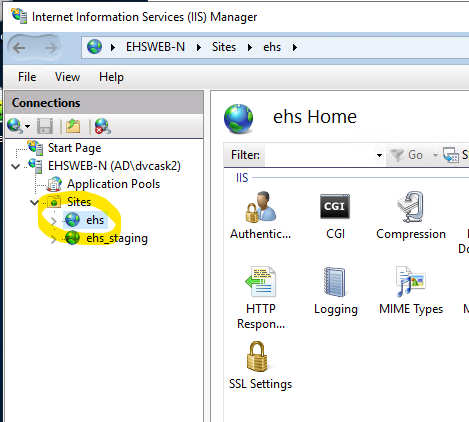
Open IIS Manager and select the target server.
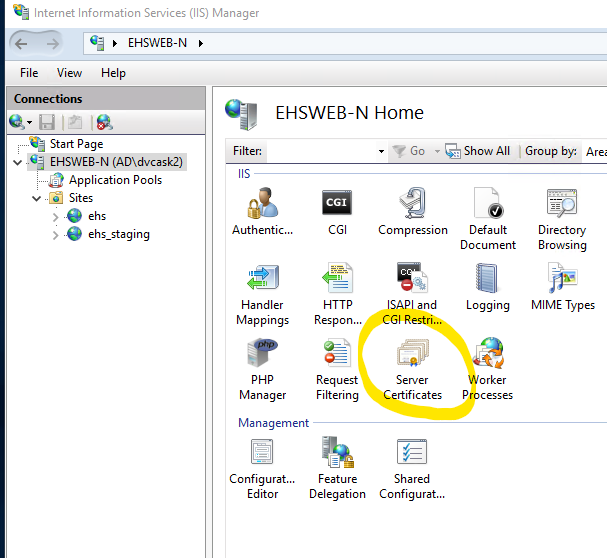
Locate and open the Server Certificates plugin. It is included as part of the default IIS Installation.
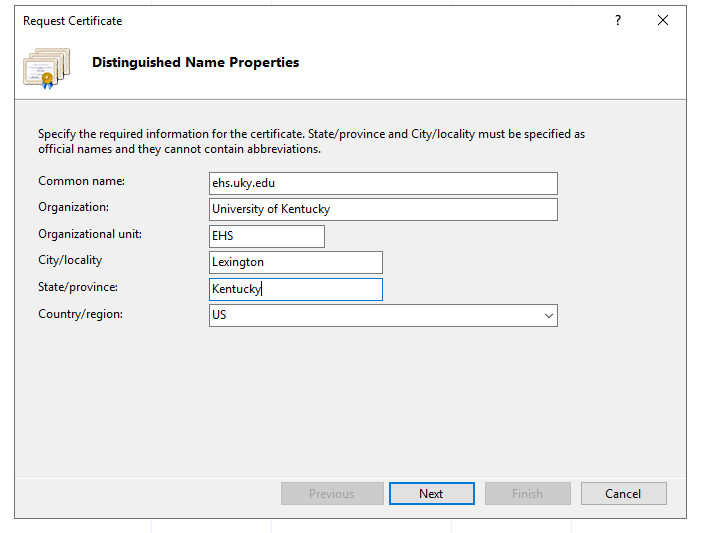
Select Create Certificate Request and fill out the name properties. The information you provide here largely depends on your relationship with certificate vendor. If there is a mismatch, the vendor may deny your certificate or IIS will throw errors during later steps that are very difficult to diagnose.
Common Name – Typically the domain name of your site.
Organization – Company/Personal name.
Organizational unit – Department/Compartmentalization.
City/locality
State/province
Country/region
When you are finished filling out the form, click Next.
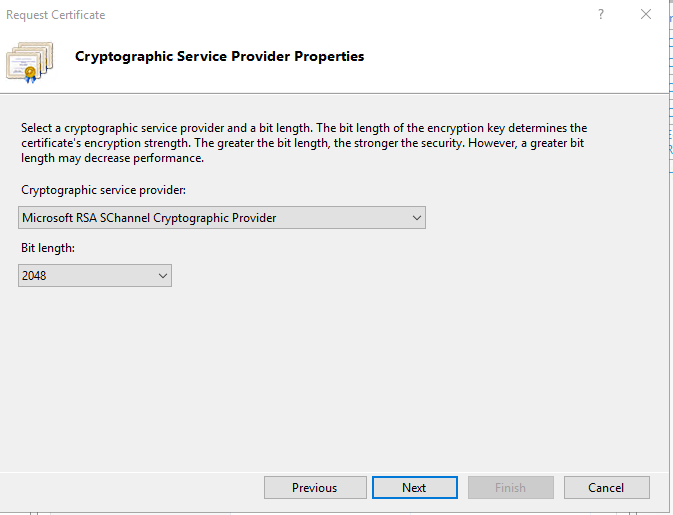
At the Cryptographic Service Provider Properties dialog, select the following options, then click Next:
Microsoft RSA SChannel Cryptographic Service Provider
2048
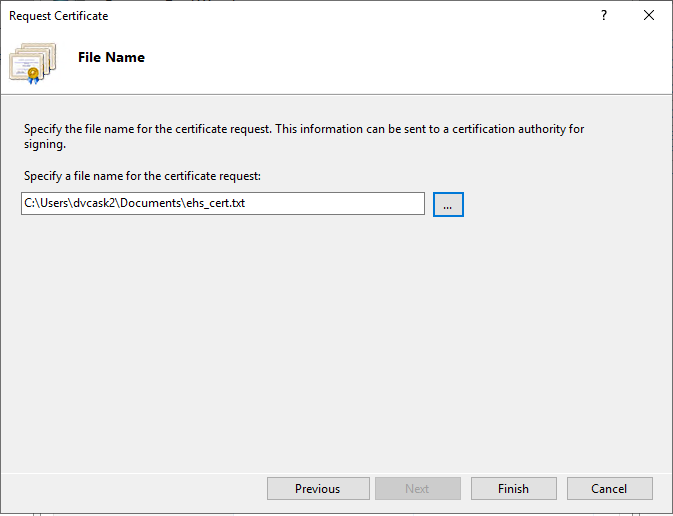
Enter the file name and location, then click Finish. This creates a Certificate Signing Request (CSR) file. You’re going to need the CSR file in subsequent steps, so make sure it’s easy to find, but don’t put it in a publicly accessible folder.
Request Signing From Vendor
Now that you have a completed CSR, you can send it to the vendor for signing. It goes without saying there are minor differences depending on the vendor, but the basic premise is universal. All reputable certificate vendors offer robust support, so don’t be afraid to contact them and ask questions.
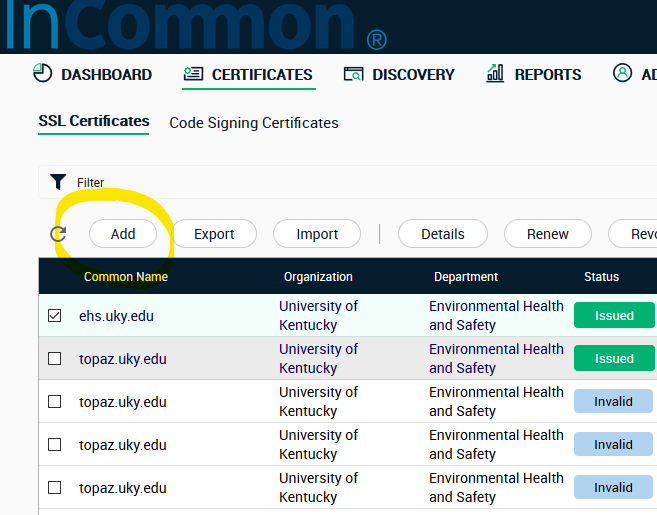
Log into your certificate vendor and create a request. For InCommon, you click Add at the certificates tab.
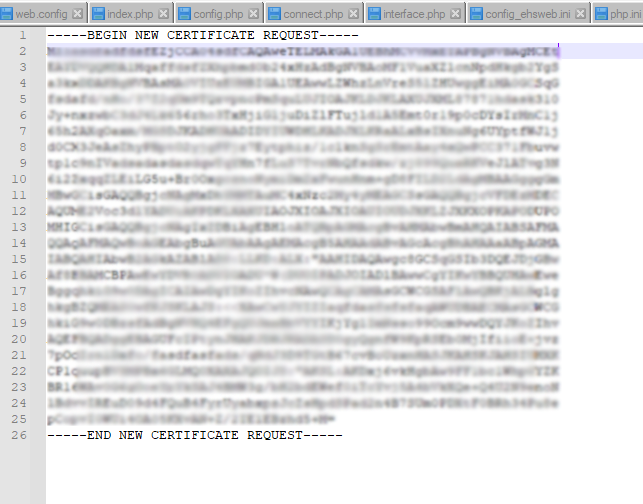
The vendor will ask for your CSR file. You may upload the file or copy the contents directly. They should look something like this:
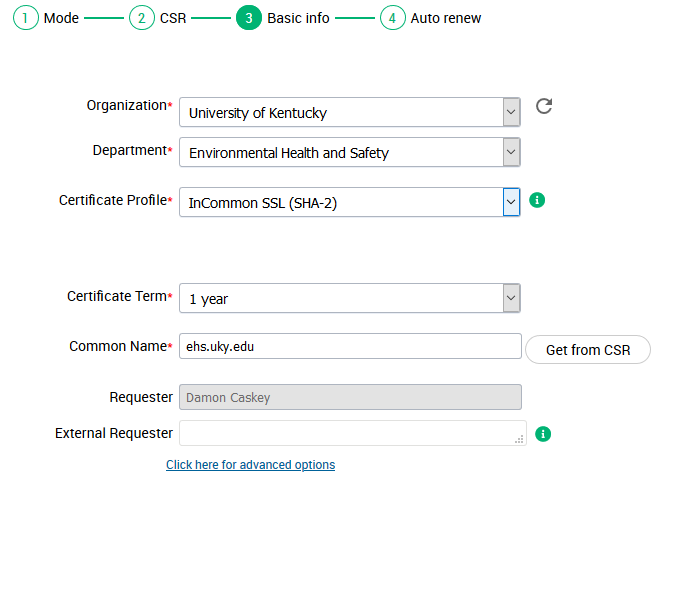
The vendor will attempt to auto-fill fields for basic information. Select SHA-2 for your certificate profile. The other fields should align with the information you filled out during CSR creation. Again, avoid mismatches.
When you complete the request, you will need to wait for your vendor to verify and issue a certificate. The time needed varies by vendor, but is usually about five minutes. Most vendors will alert you via email when the certificate is issued.
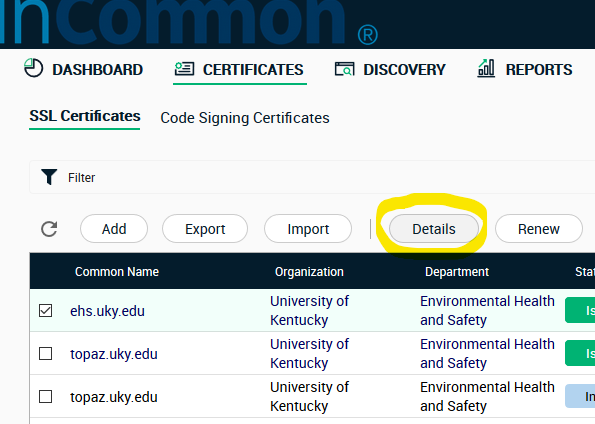
To download a certificate, log in and open the Certificates tab. Then check the appropriate certificate and click Details.
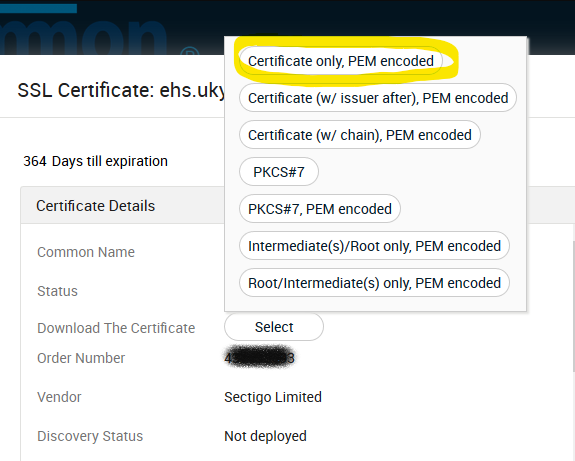
The details display provides information about your certificate and an option n to download. Click Select. If asked the type, select Certificate only, PEM encoded and download. The file extension should end with “.cer”.
Install Certificate
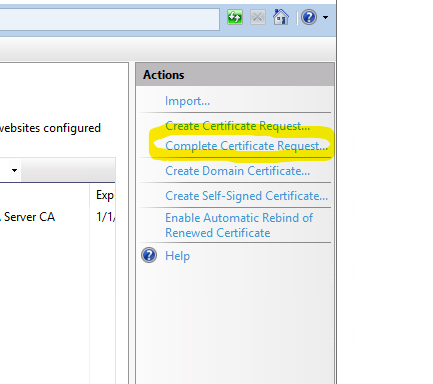
Return to IIS, open the Server Certificates plug if it is not already, and select Complete Certificate Request.
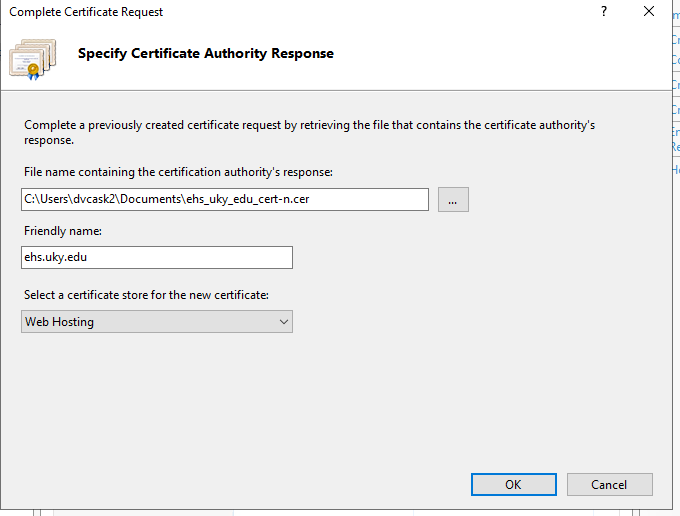
When the Complete Certificate Request dialog opens, fill out the fields with following values:
File name: Browse to the certificate file you just downloaded from vendor.
Friendly name: Ostensibly a label, but it’s best to match to match the Common Name used in certificate request. Otherwise IIS tends to throw the following error: “cannot find the certificate request associated with this certificate file. A certificate request must be completed on the computer where it was created.”. See this support article for details.
Certificate store: Web hosting.
Now hold your breath and click OK. If IIS is in a good mood, the certificate is installed. Breathe a sigh of relief. There’s more to do, but if anything was wrong, this is where the errors get thrown. If you do receive an error, I would again recommend you view this support article for the some of the most common problems. If you are still stuck, leave a comment with your issue and maybe I can help. 🙂
Binding
Installing a certificate on its own doesn’t do anything to secure your site. You still need to bind through SSL (Secure Socket Layer). Open IIS Manager, and select the target site.
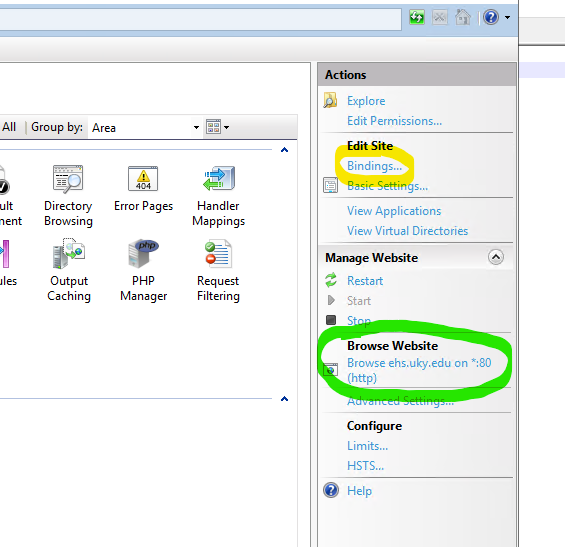
Locate the Actions sidebar, and open Bindings. Also note the available options under Browse heading.
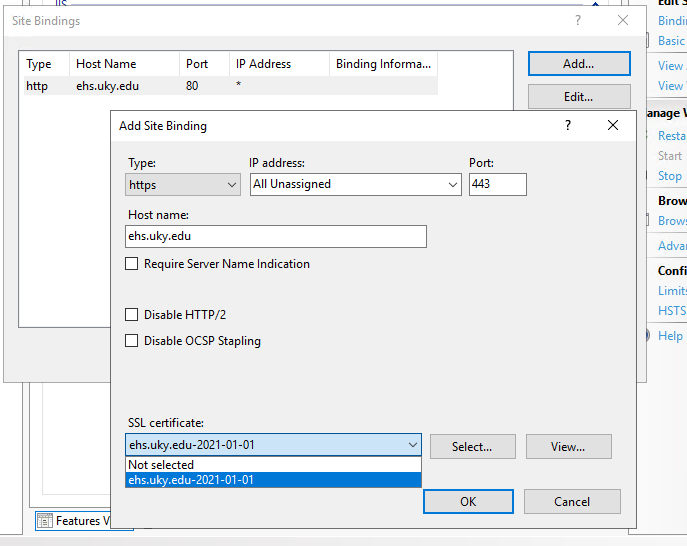
The list of current binds will open. There is most likely an http binding to port 80. Click the Add button and populate the options as followed (leave others in their default state):
Type: Https
Hostname: The domain name of your site.
SSL Certificate: Select the certificate you downloaded and installed from vendor in previous steps. Certificates are listed by their friendly name.
Click OK, and your binding is complete. Note the new option under Browse heading. Your site is now responds to requests through https://, with a trusted vendor certificate.
Final Words
It’s important to understand that enabling access through https:// may quiet browser warnings, but it does nothing at all to secure your site. All the https protocol really does is enable encrypted communication between sites and clients, and even then not by default since your clients are likely accustomed to an http:// address. Humans are humans – asking clients to update bookmarks is spitting against the wind. The only way to ensure they visit through the “https://” protocol is server side redirection. This typically requires setting up a URL rewrite, which is another article all by itself.
Just to emphasize – encrypting the client/server connection does NOT protect your site against malefactors. Hardening sites requires a concerted, multifaceted effort that is beyond the scope of any single tutorial.
This tutorial covers one of the most basic concepts of programming/scripting: User defined constants. It is meant for beginning coders and OpenBOR script writers. Upon completion, you should understand all of the following:
The definition of “Constant” in computer science (programming) as opposed to other uses of the term (such as mathematics).
How constants work in relation to other types of identifiers.
Where and how to apply constants.
Use of constants within the OpenBOR scripting engine.
Constants vs. Literals & Variables
To fully comprehend why constants are useful it is imperative to understand what a constant really is, especially compared to variables and literals. Literals are of particular note because it is very easy to confuse literals with constants. In the field of computer science, variables, constants and literals are usually defined as follows (Rao, 2017):
Variable: A variable is a storage location and an associated identifier which contains some known or unknown quantity or information, a value.
Constant: A constant is an identifier with an associated value that the program can not normally modify.
Literal: A literal is a notation for representing a fixed value.
Note the unfortunate caveat: “usually”. This is because some languages (C in particular) refer to both literals and constants as “constants” (Constants, 2020). They are then differentiated as “literal constants” and “symbolic constants” respectively. In programing circles, numeric literals are also called “magic numbers” (Definition of constants and magic numbers 2001). To avoid confusion between them we will henceforth only use the references “literal” and “constant”.
In practical terms, you may think of variables as named values that you can modify, constants as named values that you can’t modify and literals as values that mean exactly what they say. The question is how do these definitions and meanings apply in real world programming. To find out let’s start with variables and literals using this example multiplier:
i*2 = y
Applying our definitions above, there are two variables (i, y) and a single literal (2) in play:
i represents some number that can be whatever we want.
y is the product result.
2 is just two – it’s a literal value.
Now observe as we translate our equation into some code and see it in action:
int i = 0;
int y = 1;

for (i = 0; i < 10; i++)
{
    y = y * 2;
    print("Result %i: %i\n", i+1, y);
}
This will get us a simple geometric progression. First, we assign variable i a value of zero. Then we increment i by one in a loop until it is no longer less than ten. At each pass we assign y the product of y * 2. Then we print the cursor row and current value of y, giving us the following output:
Result 1: 2
Result 2: 4
Result 3: 8
Result 4: 16
Result 5: 32
Result 6: 64
Result 7: 128
Result 8: 256
Result 9: 512
Result 10: 1024
Observe how our literal value 2 worked in relation to the variables surrounding it. Note the number 10 is also a literal, but for simplicity let’s just worry about 2. We could run this loop to infinity and it will always multiply y * 2 and assign the result to y. The variables i and y are continuously modified while 2 never changes. Easy enough yes? Remember:
Literals are static values written directly into source code; they “literally” mean what they say. Variables are IDs which are assigned values that can be (and usually are) modified while the program executes.
Now what would happen if we need to calculate our equation again, only dividing by 2 rather than multiplying? As an example, we’ll make a copy of our loop with a minor modification and run both in sequence.
int i = 0;
int y = 1;

print("\n Multiply %i:\n\n", 2);

for (i = 0; i < 10; i++)
{
    y = y * 2;
    print("Result %i: %i\n", i+1, y);
}

print("\n\n Divide %i:\n\n", 2);

for (i = 0; i < 10; i++)
{
    y = y / 2;
    print("Result %i: %i\n", i+1, y);
}
We’ll get the following output.
Multiply 2:

Result 1: 2
Result 2: 4
Result 3: 8
Result 4: 16
Result 5: 32
Result 6: 64
Result 7: 128
Result 8: 256
Result 9: 512
Result 10: 1024

Divide: 2

Result 1: 512
Result 2: 256
Result 3: 128
Result 4: 64
Result 5: 32
Result 6: 16
Result 7: 8
Result 8: 4
Result 9: 2
Result 10: 1
As you can see in the second example, we start with the geometric progression pattern from earlier and then reverse it. For purposes of our example, the output is not that important. What matters here is how we use the literal 2 four times in succession – once for each label and each operation. No problem thus far. But suppose later we need to substitute 2 with 10? Just edit the code and be done right? With examples like this, of course! Unfortunately real world coding is not so simple. Consider a real script or program. Even a something simple like some of the scripts powering this website may comprise several pages of code. For perspective, the OpenBOR engine contains ~600K lines of source code. Some of the largest applications can number in the millions. Now imagine trying to locate and edit every instance of 2. Or worse, trying to locate specific instances of 2, and leaving the rest alone. Even with advanced regex expressions, assuming those are available at all, copy/paste operations can be effectively impossible. Hand editing is time prohibitive and error prone. This is where constants are so valuable. Let’s look at our example once again, with a little something extra added.
#define SOMENUM 2

int i = 0;
int y = 1;

print("\n Multiply %i:\n\n", SOMENUM);

for (i = 0; i < 10; i++)
{
    y = y * SOMENUM;
    print("Result %i: %i\n", i+1, y);
}

print("\n\n Divide %i:\n\n", SOMENUM);

for (i = 0; i < 10; i++)
{
    y = y / SOMENUM;
    print("Result %i: %i\n", i+1, y);
}
As you’ve no doubt guessed, this and the previous example produce identical results. The difference is we no longer rely on a literal 2. Instead, this line creates a constant identified as SOMENUM and assigns it the value of 2:
#define SOMENUM 2
Just as i represents a loop counter value, SOMENUM represents the number 2. But unlike i and Y, SOMENUM can never change while the program is running. It maintains a constant value, hence the name. Effectively we have given a potentially VERY common value (2) its own unique identification. Attaching an identification to values that never change is an extra step that may seem silly at first, but in the long run actually saves you time. It is almost universally considered best practice (Recommended C Style and Coding Standards 2000).
There is no need to modify the code in multiple places. If we want to substitute our constant value for something else, we merely change the #define. Depending on scope of the program, this can range from being a simple time saver to enabling adjustments that are otherwise untenable or virtually impossible.
You may give constants nearly any imaginable label. That in turn enables creation of organized naming conventions for cleaner, more human readable code. This means superior design malleability, greater run time stability, and easier debugging when anomalies do occur.
It is possible to write programs with configuration blocks for simplistic modification of basic behavior and quick porting to other hardware platforms.
Separation of code and content! Why write a formula that only adds 2+2 when X+Y can perform the same task with infinite re-usability?
How To Use Constants In Your Code
Using constants is amazingly simple, but like any programming technique also sometimes mercurial. Every coding environment will have its own set of operators, methods, capabilities, and quirks. I will be focusing mainly on the the C based scripting engine of OpenBOR. A cursory Google search should provide all the instruction you need for other tools of choice.
OpenBOR’s scripting engine is a C derivative and supports the define directive for constants. A define comprises three parts:
Definition: Always “#define”.
Identification: This is the name of your constant.
Token: The value. This is what the computer will interpret whenever the constant is encountered in code.
#define SOME_IDENTIFICATION somevalue
Don’t worry about memory or CPU resources. The define directive is prepossessed, meaning the application handles it on start up. In other words, constants have no memory or run-time CPU cost.
General Tips
Naming Conventions
Decide on a naming convention before you start writing code. You will want names that are unique enough to avoid conflict while remaining reasonably succinct. Common practice is to use all caps for the identifier, with an underscore separator between each segment. The segments themselves should maintain Big Endian order.
#define BOVINAE_BISON			"Bison"	// Best in the west!
#define BOVINAE_BOS				"Cow"	// It's what's for dinner.
#define SIZE_LARGE				16		// Full meal.
#define SIZE_MEDIUM				12		// Light snack.
#define SIZE_SMALL				10		// For the kiddies.
#define TEMP_DONE_MAX			100		// Mmmmummm, that's the stuff!
#define TEMP_DONE_MIN			71		// Nice and brown.
#define TEMP_MEDIUM_MAX			65		// Little cold, but not bad.
#define TEMP_MEDIUM_MIN			60		// In a hurry?
#define TEMP_MEDIUM_WELL_MAX	69		// Not too shabby.
#define TEMP_MEDIUM_WELL_MIN	65		// Add some Worcestershire and we'll talk.
#define TEMP_RARE_MAX			55		// Somebody call a blood bank.
#define TEMP_RARE_MIN			52		// Moo!
Note the larger group of Subfamily appears first, followed by Genus. We follow a similar convention for cut size and cooking temperature. Who’s in the mood for a SIZE_LARGE BOVINAE_BOS TEMP_WELL_MAX?
Text File Use
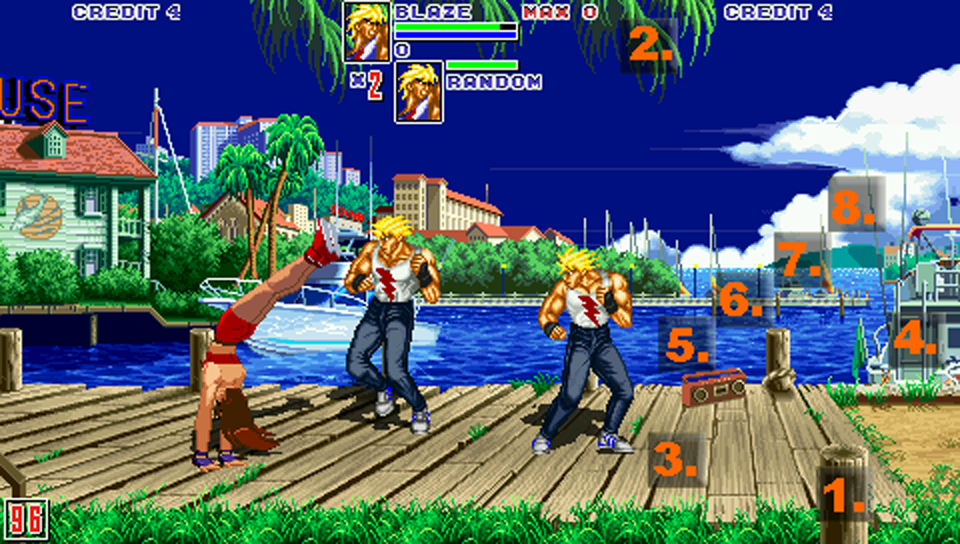
In OpenBOR, any constants available in a model’s animation script are also available in the model text. This means constants are usable inside of @script tags or as function arguments in @cmd tags.
Reading this function call is very difficult unless the creator has a perfect memory, and it’s impossible for anyone else….
@cmd set_bind_state 7 1
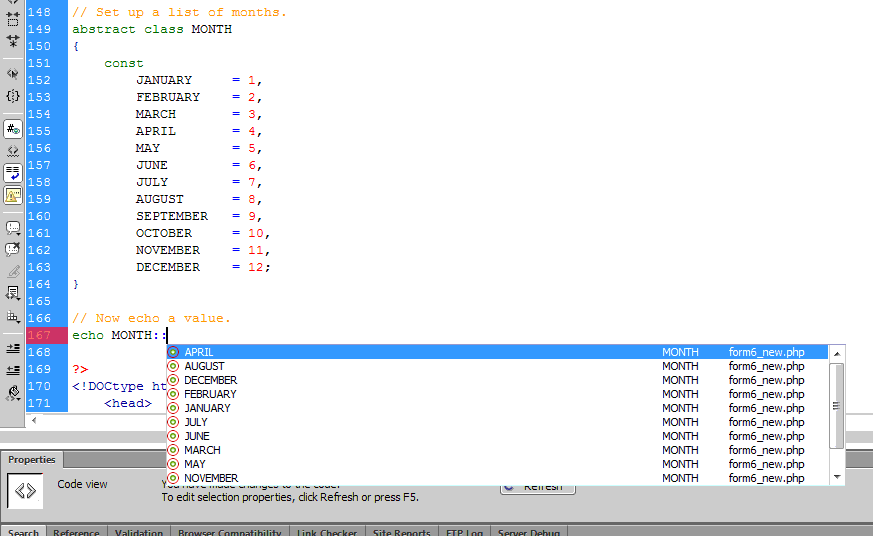
…but with constants, the creator can instantly identify what the function call should do, and if need be can easily find related calls with a text search. Other readers may not understand right away, but they can probably get a rough idea and debug from context:
One of the more common questions involving constants is “When should I use them?” The answer is “whenever possible.” As a more usable interpretation of “whenever possible”, consider the following:
Is the value static?
Will you use the value more than once?
Does the value lack infinite range and variation?
If the value fits these criteria, then replace it with a constant. Remember, defined constants in OpenBOR are “free”, they don’t consume any more resources than the literal values they replace.
Final Words
I hope this helps you to understand how simple, elegant and useful constants can be, and I would encourage you to make full use of them in your own projects. Lastly, please feel free to leave comments below with any questions or opinions you may have, and I will see to them in short order. If you have any questions about the OpenBOR engine, stop by at ChronoCrash and we’ll be glad to help.
Working with text strings in C is the kind of 04:00 in the morning, keyboard smashing, programing purgatory most of us wouldn’t wish on our most anorak frenemy. No worries though right? You finally got your brilliant 50K creation compiled and ready to unleash upon the world.
Then it returns a week later in pieces, hacked apart at the seams. Evidently your personal take on Snake is to blame for shutting down the CIA, dumping Experian’s data coffers, and exposing Anna Kendrick’s Playboy negatives. Oops.
Should have sanitized that name input…
Buffer overflows are one of the oldest, most exploited, and on the surface truly asinine flaws in the computer industry today. Yet they stubbornly persist despite all efforts, begging the simple questions of how, and why?
This article, written by Perter Bright is one of the most comprehensive and well penned answers I believe you’ll find. Given the finicky nature of the net (Link rot for everyone!), a copy in full also appears below. I highly recommend you take a look.
How security flaws work: The buffer overflow
Starting with the 1988 Morris Worm, this flaw has bitten everyone from Linux to Windows.
The buffer overflow has long been a feature of the computer security landscape. In fact the first self-propagating Internet worm—1988’s Morris Worm—used a buffer overflow in the Unix finger daemon to spread from machine to machine. Twenty-seven years later, buffer overflows remain a source of problems. Windows infamously revamped its security focus after two buffer overflow-driven exploits in the early 2000s. And just this May, a buffer overflow found in a Linux driver left (potentially) millions of home and small office routers vulnerable to attack.
At its core, the buffer overflow is an astonishingly simple bug that results from a common practice. Computer programs frequently operate on chunks of data that are read from a file, from the network, or even from the keyboard. Programs allocate finite-sized blocks of memory—buffers—to store this data as they work on it. A buffer overflow happens when more data is written to or read from a buffer than the buffer can hold.
On the face of it, this sounds like a pretty foolish error. After all, the program knows how big the buffer is, so it should be simple to make sure that the program never tries to cram more into the buffer than it knows will fit. You’d be right to think that. Yet buffer overflows continue to happen, and the results are frequently a security catastrophe.
To understand why buffer overflows happen—and why their impact is so grave—we need to understand a little about how programs use memory and a little more about how programmers write their code. (Note that we’ll look primarily at the stack buffer overflow. It’s not the only kind of overflow issue, but it’s the classic, best-known kind.)
Stack it up
Buffer overflows create problems only for native code—that is, programs which use the processor’s instruction set directly rather than through some intermediate form such as in Java or Python. The overflows are tied to the way the processor and native code programs manipulate memory. Different operating systems have their own quirks, but every platform in common use today follows essentially the same pattern. To understand how these attacks work and some of the things people do to try to stop them, we first have to understand a little about how that memory is used.
The most important central concept is the memory address. Every individual byte of memory has a corresponding numeric address. When the processor loads and stores data from main memory (RAM), it uses the memory address of the location it wants to read and write from. System memory isn’t just used for data; it’s also used for the executable code that makes up our software. This means that every function of a running program also has an address.
In the early days of computing, processors and operating systems used physical memory addresses: each memory address corresponded directly to a particular piece of RAM. While some pieces of modern operating systems still have to use these physical memory addresses, all of today’s operating systems use a scheme called virtual memory.
With virtual memory, the direct correspondence between a memory address and a physical location in RAM is broken. Instead, software and the processor operate using virtual memory addresses. The operating system and processor together maintain a mapping between virtual memory addresses and physical memory addresses.
This virtualization enables a range of important features. The first and foremost is protected memory. Every individual process gets its own set of addresses. For a 32-bit process, those addresses start at zero (for the first byte) and run up to 4,294,967,295 (or in hexadecimal, 0xffff'ffff; 232 – 1). For a 64-bit process, they run all the way up to 18,446,744,073,709,551,615 (0xffff'ffff'ffff'ffff, 264 – 1). So, every process has its own address 0, its own address 1, its own address 2, and so on and so forth.
(For the remainder of this article, I’m going to stick to talking about 32-bit systems, except where otherwise noted. 32- and 64-bit systems work in essentially the same ways, so everything translates well enough; it’s just a little clearer to stick to one bitness.)
Because each process gets its own set of addresses, these scheme in a very straightforward way to prevent one process from damaging the memory of any other: all the addresses that a process can use reference memory belonging only to that process. It’s also much easier for the processes to deal with; physical memory addresses, while they broadly work in the same way (they’re just numbers that start at zero), tend to have wrinkles that make them annoying to use. For example, they’re usually not contiguous; address 0x1ff8'0000 is used for the processor’s System Management Mode memory; a small chunk of physical memory that’s off limits to normal software. Memory from PCIe cards also generally occupies some of this address space. Virtual addresses have none of these inconveniences.
So what does a process have in its address space? Broadly speaking, there are four common things, of which three interest us. The uninteresting one is, in most operating systems, “the operating system kernel.” For performance reasons, the address space is normally split into two halves, with the bottom half being used by the program and the top half being the kernel’s address space. The kernel-half of the memory is inaccessible to the program’s half, but the kernel itself can read the program’s memory. This is one of the ways that data is passed to kernel functions.
The first things that we need to care about are the executables and libraries that constitute the program. The main executable and all its libraries are all loaded into the process’ address space, and all of their constituent functions accordingly have memory addresses.
The second is the memory that the program uses for storing the data it’s working on, generally called the heap. This might be used, for example, to store the document currently being edited, the webpage (and all its JavaScript objects, CSS, and so on) being viewed, or the map for the game being played.
The third and most important is the call stack, generally just called the stack. This is the most complex aspect. Every thread in a process has its own stack. It’s a chunk of memory that’s used to keep track of both the function that a thread is currently running, as well as all the predecessor functions—the ones that were called to get to the current function. For example, if function a calls function b, and function b calls function c, then the stack will contain information about a, b, and c, in that order.
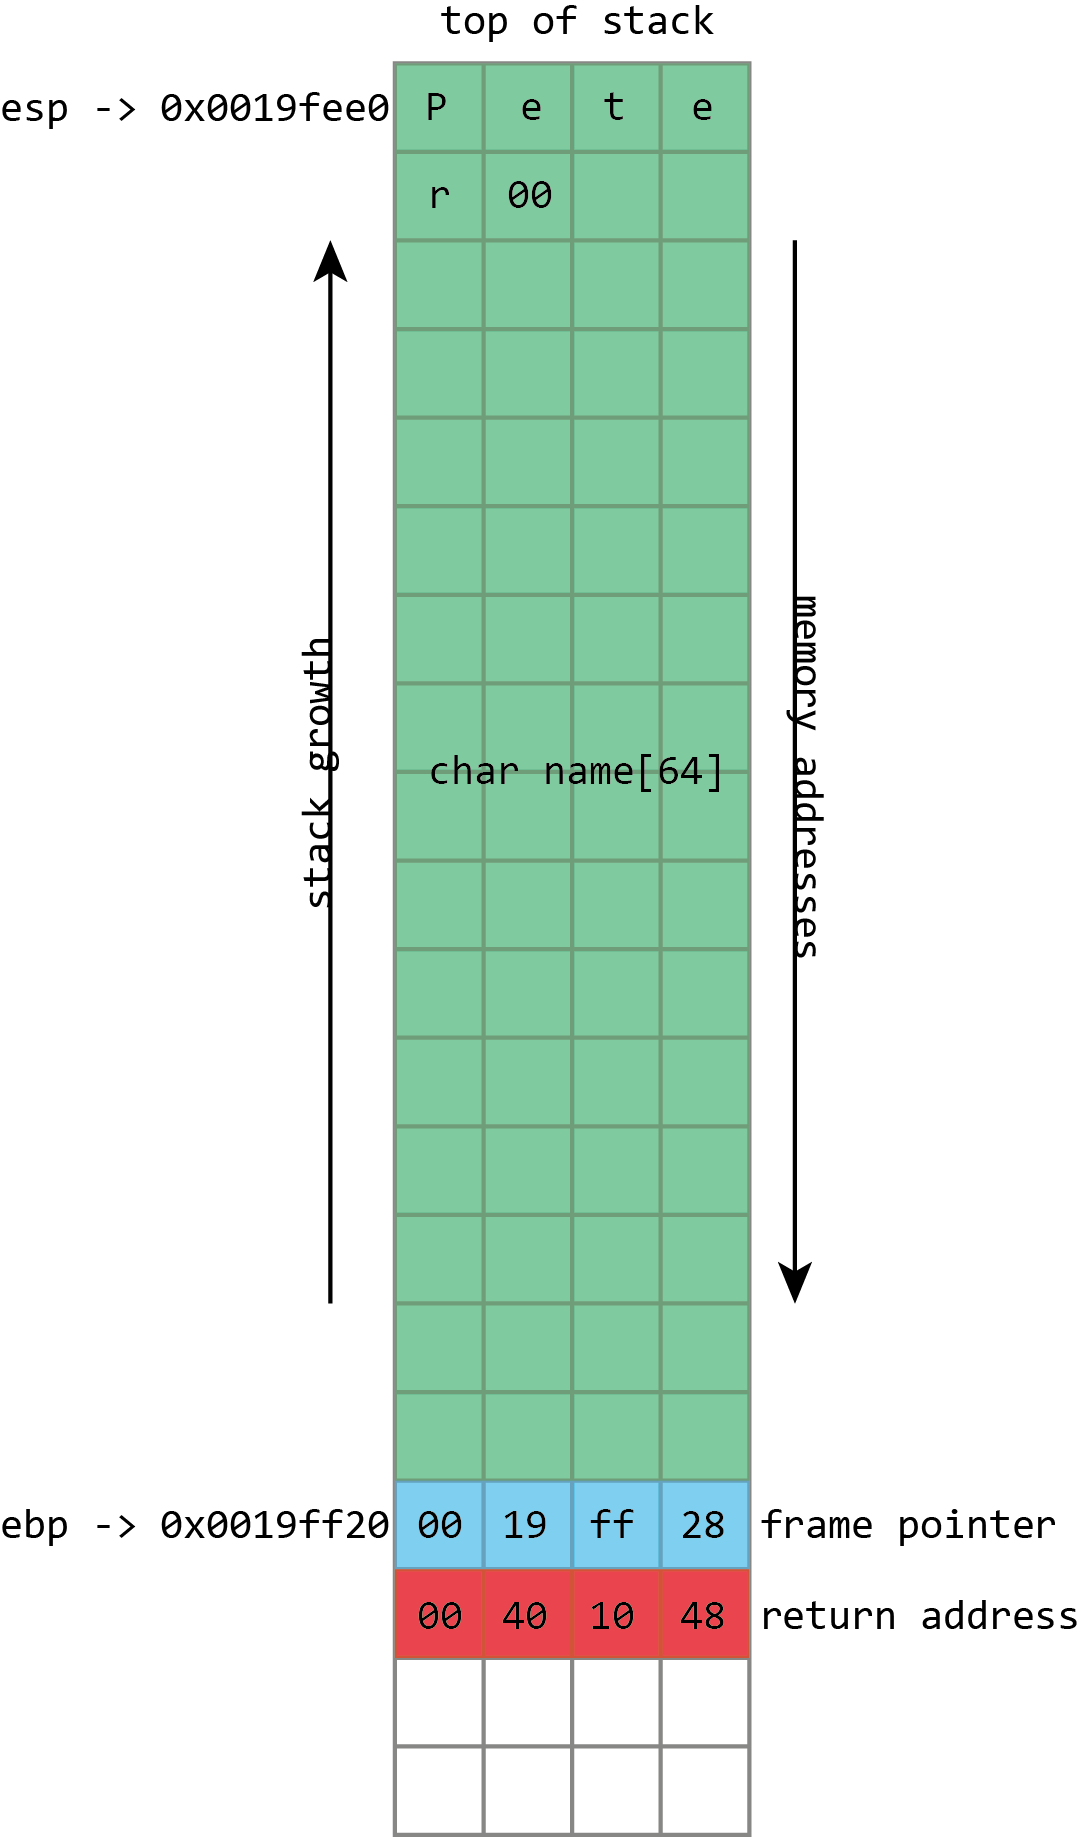
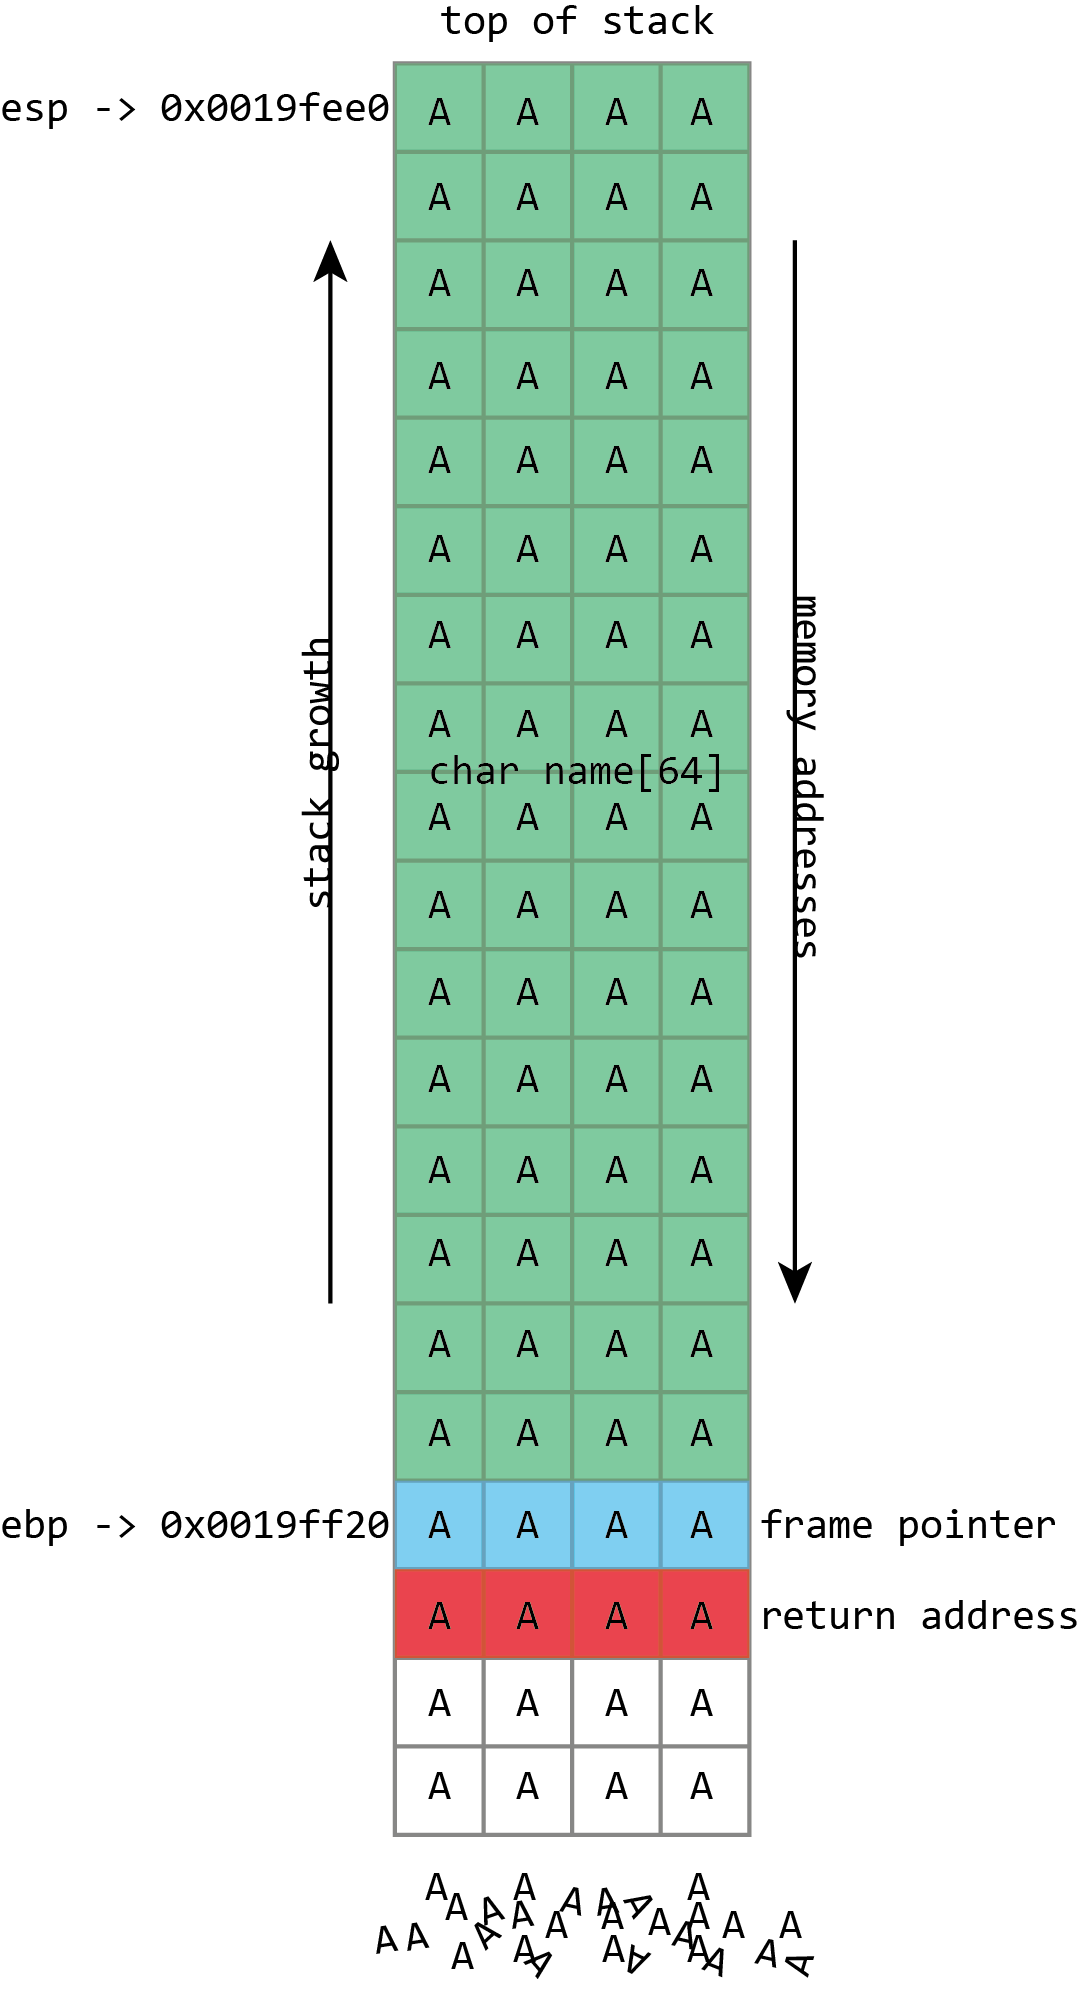
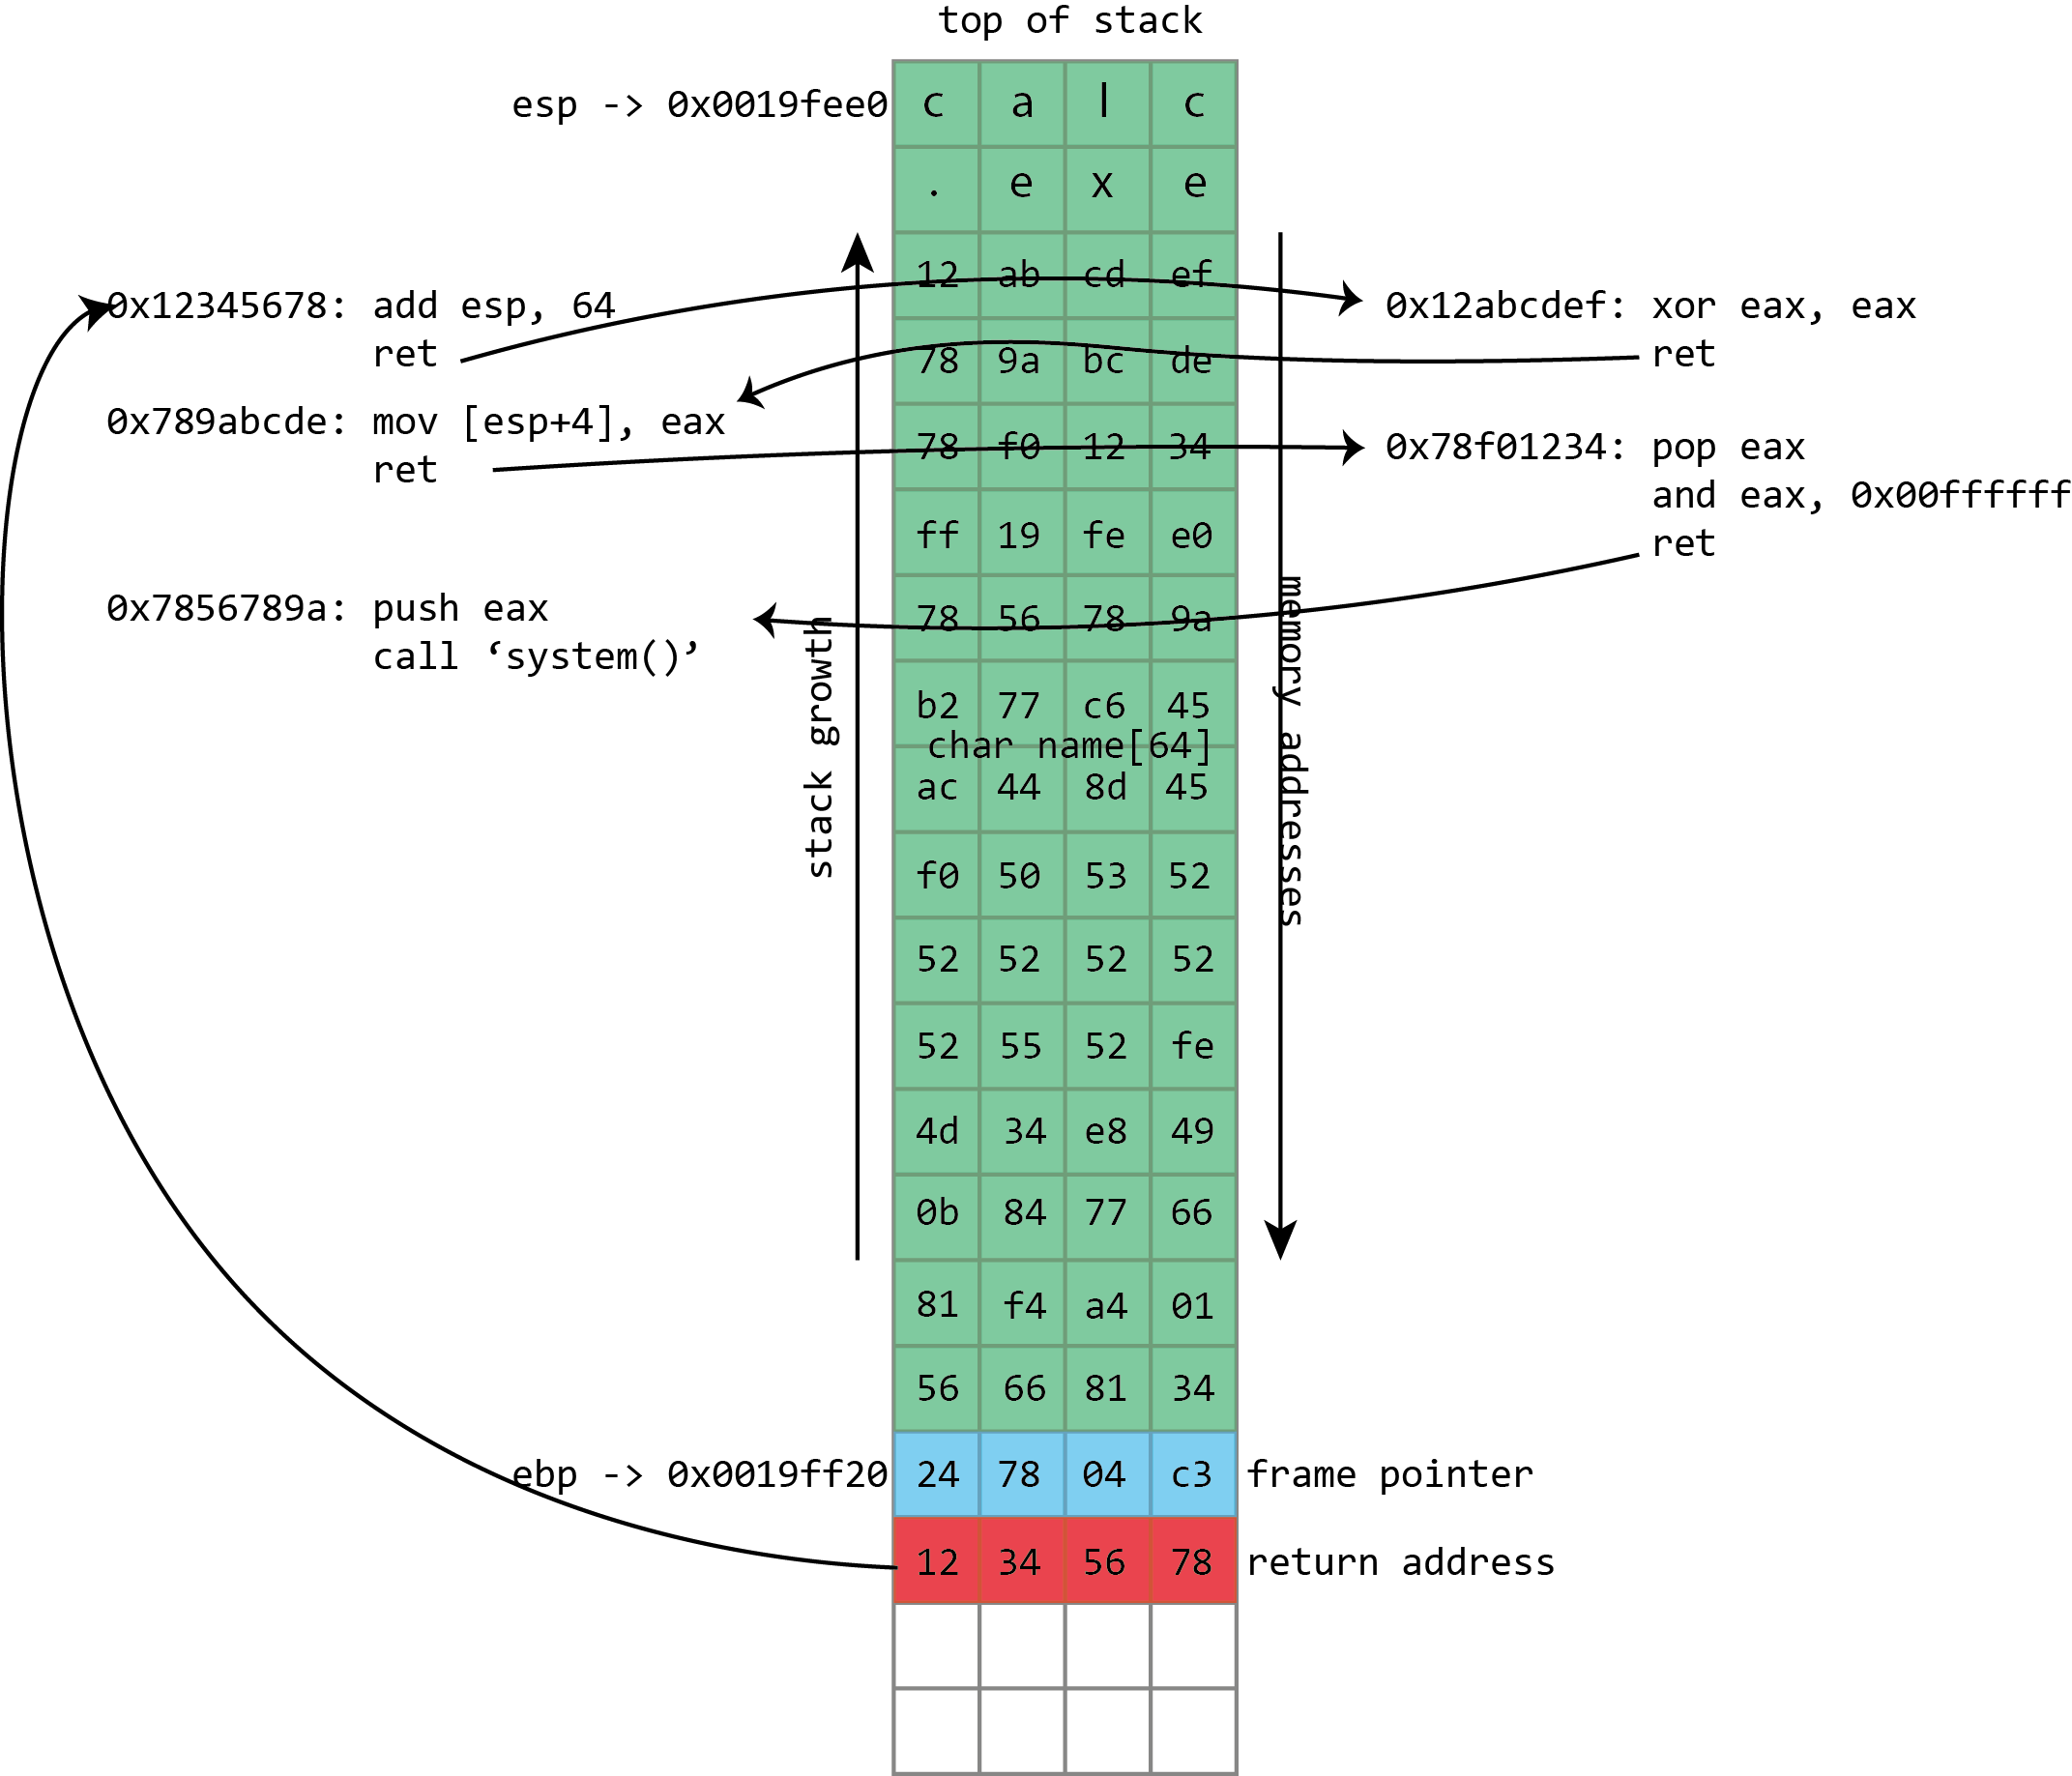
Here we see the basic layout of our stack with a 64 character buffer called name, then the frame pointer, and then the return address. esp has the address of the top of the stack, ebp has the address of the frame pointer.
The call stack is a specialized version of the more general “stack” data structure. Stacks are variable-sized structures for storing objects. New objects can be added (“pushed”) to one end of the stack (conventionally known as the “top” of the stack), and objects can be removed (“popped”) from the stack. Only the top of the stack can be modified with a push or a pop, so the stack forces a kind of sequential ordering: the most recently pushed item is the one that gets popped first. The first item that gets pushed on the stack is the last one that gets popped.
The most important thing that the call stack does is to store return addresses. Most of the time, when a program calls a function, that function does whatever it is supposed to do (including calling other functions), and then returns to the function that called it. To go back to the calling function, there must be a record of what that calling function was: execution should resume from the instruction after the function call instruction. The address of this instruction is called the return address. The stack is used to maintain these return addresses: whenever a function is called, the return address is pushed onto the stack. Whenever a function returns, the return address is popped off the stack, and the processor begins executing the instruction at that address.
This stack functionality is so fundamentally important that most, if not all, processors include built-in support for these concepts. Consider x86 processors. Among the registers (small storage locations in the processor that can be directly accessed by processor instructions) that x86 defines, the two that are most important are eip, standing for “instruction pointer,” and esp, standing for stack pointer.
esp always contains the address of the top of the stack. Each time something is pushed onto the stack, the value in esp is decreased. Each time something is popped from the stack, the value of esp is increased. This means that the stack grows “down;” as more things are pushed onto the stack, the address stored in esp gets lower and lower. In spite of this, the memory location referenced by esp is still called the “top” of the stack.
eip gives the address of the currently executing instruction. The processor maintains eip itself. It reads the instruction stream from memory and increments eip accordingly so that it always has the instruction’s address. x86 has an instruction for function calls, named call, and another one for returning from a function, named ret.
call takes one operand; the address of the function to call (though there are several different ways that this can be provided). When a call is executed, the stack pointer esp is decremented by 4 bytes (32-bits), and the address of the instruction following the call, the return address, is written to the memory location now referenced by esp—in other words, the return address is pushed onto the stack. eip is then set to the address specified as operand to call, and execution continues from that address.
ret does the opposite. The simple ret doesn’t take any operands. The processor first reads the value from the memory address contained in esp, then increments esp by 4 bytes—it pops the return address from the stack. eip is set to this value, and execution continues from that address.
If the call stack only contained a sequence of return addresses, there wouldn’t be much scope for problems. The real problem comes with everything else that goes on the stack, too. The stack happens to be a quick and efficient place for storing data. Storing data on the heap is relatively complex; the program needs to keep track of how much space is available on the heap, how much space each piece of data is using, and various other bits of bookkeeping. But the stack is also simple; to make space for some data, just decrement the stack pointer. To tidy up when the data is no longer needed, increment the stack pointer.
This convenience makes the stack a logical place to store the variables that belong to a function. A function has a 256 byte buffer to read some user input? Easy, just subtract 256 from the stack pointer and you’ve created the buffer. At the end of the function, just add 256 back onto the stack pointer, and the buffer is discarded.
When we use the program correctly, the keyboard input is stored in the name buffer, followed by a null (zero) byte. The frame pointer and return address are unaltered.
There are limitations to this. The stack isn’t a good place to store very large objects; the total amount of memory available is usually fixed when a thread is created, and that’s typically around 1MB in size. These large objects must be placed on the heap instead. The stack also isn’t usable for objects that need to exist for longer than the span of a single function call. Because every stack allocation is undone when a function exits, any objects that exist on the stack can only live as long as a function is running. Objects on the heap, however, have no such restriction; they can hang around forever.
This stack storage isn’t just used for the named variables that programmers explicitly create in their programs; it can also be used for storing whatever other values the program may need to store. This is traditionally a particularly acute concern on x86. x86 processors don’t have very many registers (there are only 8 integer registers in total, and some of those, like eip and esp, already have special purposes), and so functions can rarely keep all the values they need in registers. To free up space in a register while still ensuring that its current value can be retrieved later, the compiler will push the value of the register onto the stack. The value can then be popped later to put it back into a register. In compiler jargon, this process of saving registers so that they can be re-used is called spilling.
Finally, the stack is often used to pass arguments to functions. The calling function pushes each argument in turn onto the stack; the called function can then pop the arguments off. This isn’t the only way of passing arguments—they can be passed in registers too, for example—but it’s one of the most flexible.
The set of things that a function has on the stack—its local variables, its spilled registers, and any arguments it’s preparing to pass to another function—is called a “stack frame.” Because data within the stack frame is used so extensively, it’s useful to have a way of quickly referencing it.
The stack pointer can do this, but it’s somewhat awkward: the stack pointer always points to the top of the stack, and so it moves around as things are pushed and popped. For example, a variable may start out with an address of at esp + 4. Two more values might be pushed onto the stack, meaning that the variable now has to be accessed at esp + 12. One of those values can then get popped off, so the variable is now at esp + 8.
This isn’t an insurmountable difficulty, and compilers can easily handle the challenge. Still, it can make using the stack pointer to access anything other than “the top of the stack” awkward, especially for the hand-coded assembler.
To make things easier, it’s common to maintain a second pointer, one that consistently stores the address of the bottom (start) of each stack frame—a value known as the frame pointer—and on x86, there’s even a register that’s generally used to store this value, ebp. Since this never changes within a given function, this provides a consistent way to access a function’s variables: a value that’s at ebp - 4 will remain at ebp - 4 for the whole of a function. This isn’t just useful for humans; it also makes it easier for debuggers to figure out what’s going on.
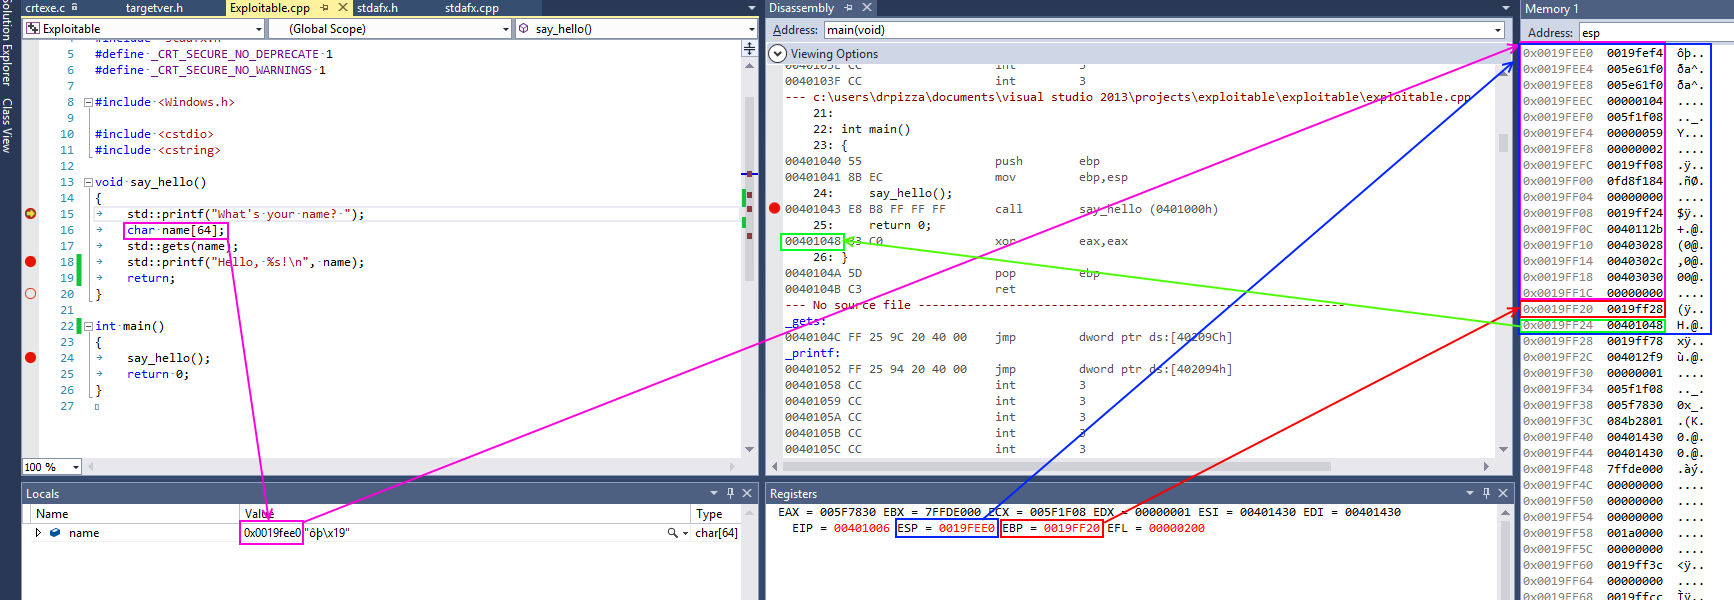
This screenshot from Visual Studio shows some of this in action for a simple x86 program. On x86 processors, the register named esp contains the address of the top stack, in this case 0x0019fee0, highlighted in blue (on x86, the stack actually grows downwards, toward memory address 0, but it’s still called the top of the stack anyway). This function only has one stack variable, name, highlighted in pink. It’s a fixed size 32-byte buffer. Because it’s the only variable, its address is also 0x0019fee0, the same as the top of the stack.x86 also has a register called ebp, highlighted in red, that’s (normally) dedicated to storing the location of the frame pointer. The frame pointer is placed immediately after the stack variables. Right after the frame pointer is the return address, highlighted in green. The return address references a code fragment with address 0x00401048. This instruction comes immediately after a call instruction, making clear the way the return address is used to resume execution from where the calling function left off.
Unfortunately gets() is a really stupid function. If we just hold down A on the keyboard it won’t stop once it’s filled the name buffer. It’ll just keep on writing data to memory, overwriting the frame pointer, the return address, and anything and everything else it can.
name in the above screenshot is the kind of buffer that’s regularly overflowed. Its size is fixed at exactly 64 characters. In this case it’s filled with a bunch of numbers, and it ends in a final null. As should be clear from the above picture, if more than 64 bytes are written into the name buffer, then other values on the stack will be damaged. If four extra bytes are written, the frame pointer will be destroyed. If eight extra bytes are written, both the frame pointer and the return address get overwritten.
Clearly this will lead to damaging the program’s data, but the problem of buffer flows is more serious: they often lead to code execution. This happens because those overflowed buffers won’t just overwrite data. They can also overwrite the other important thing kept on the stack—those return addresses. The return address controls which instructions the processor will execute when it’s finished with the current function; it’s meant to be some location within the calling function, but if it gets overwritten in a buffer overflow, it could point anywhere. If attackers can control the buffer overflow, they can control the return address; if they can control the return address, they can choose what code the processor executes next.
The process probably won’t have some nice, convenient “compromise the machine” function for the attacker to run, but that doesn’t really matter. The same buffer that was used to overwrite the return address can also be used to hold a short snippet of executable code, called shellcode, that will in turn download a malicious executable, or open up a network connection, or do whatever else the attacker fancies.
Traditionally, this was trivial to do because of a trait that may seem a little surprising: generally, each program would use the same memory addresses each time you ran it, even if you rebooted in between. This means that the location of the buffer on the stack would be the same each time, and so the value used to overwrite the return address could be the same each time. An attacker only had to figure out what the address was once, and the attack would work on any computer running the flawed code.
An attacker’s toolkit
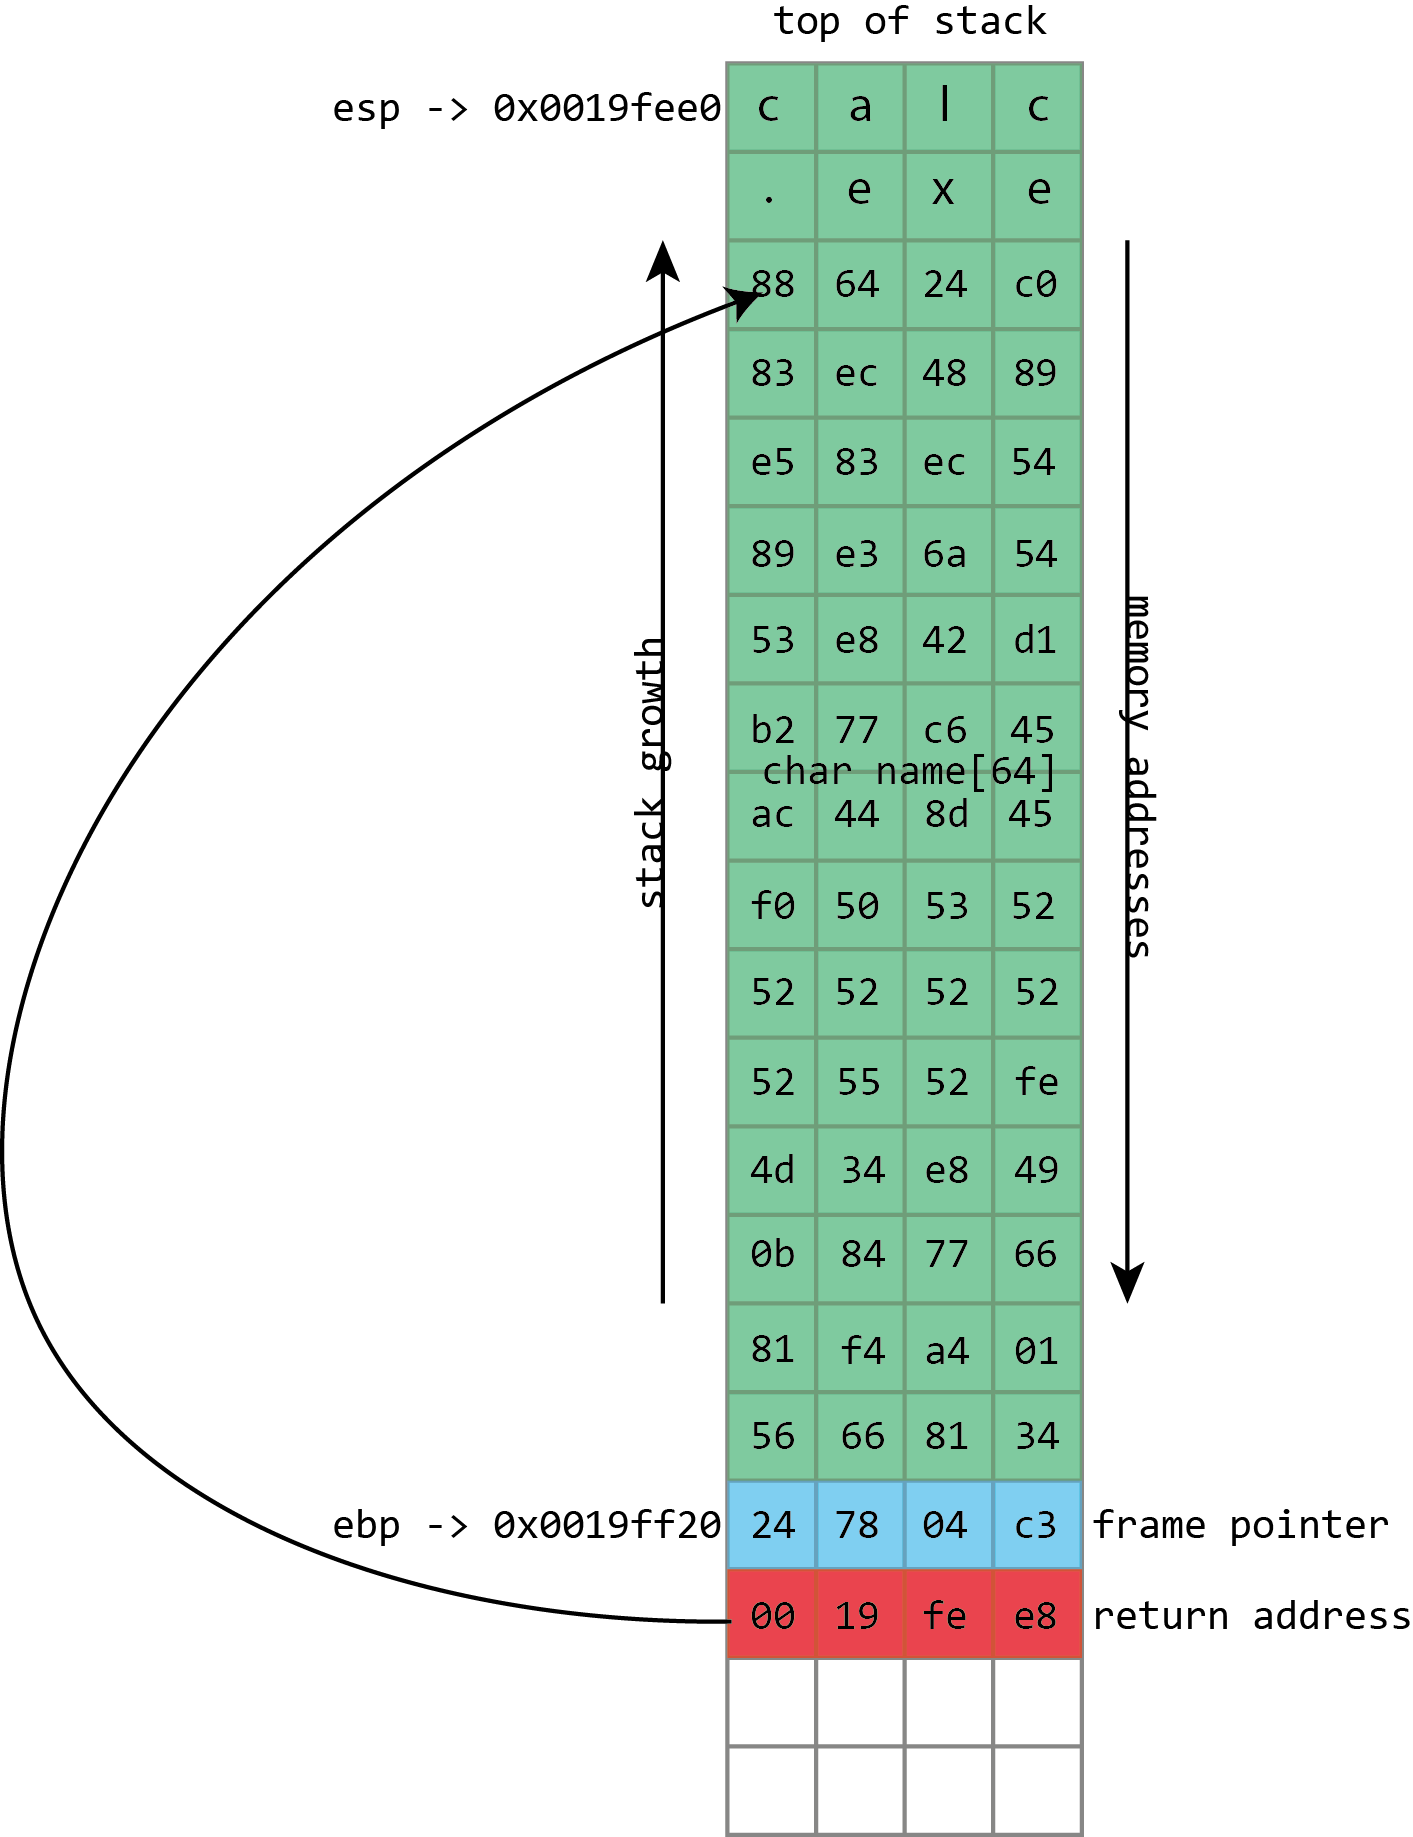
In an ideal world—for the attacker, that is—the overwritten return address can simply be the address of the buffer. When the program is reading input from a file or a network, this can often be the case for example.
Other times the attacker has to employ tricks. In functions that process human-readable text, the zero byte (or “null”) is often treated specially; it indicates the end of a string, and the functions used for manipulating strings—copying them, comparing them, combining them—will stop whenever they hit the null character. This means that if the shellcode contains the null character, those routines are liable to break it.
To exploit the overflow, instead of just writing As and smashing everything, the attacker fills the buffer with shellcode: a short piece of executable code that will perform some action of the attacker’s choosing. The return address is then overwritten with an address referring to the buffer, directing the processor to execute the shellcode when it tries to return from a function call.
To handle this, attackers can use various techniques. Pieces of code can convert shellcode that contains null characters into equivalent sequences that avoid the problem byte. They can even handle quite strict restrictions; for example, an exploitable function may only accept input that can be typed on a standard keyboard.
The address of the stack itself often contains a null byte, which is similarly problematic: it means that the return address cannot be directly set to the address of the stack buffer. Sometimes this isn’t a big issue, because some of the functions that are used to fill (and, potentially, overflow) buffers will write a null byte themselves. With some care, they can be used to put the null byte in just the right place to set the return address to that of the stack.
Even when that isn’t possible, this situation can be handled with indirection. The program and all its libraries mean that memory is littered with executable code. Much of this executable code will have an address that’s “safe,” which is to say has no null bytes.
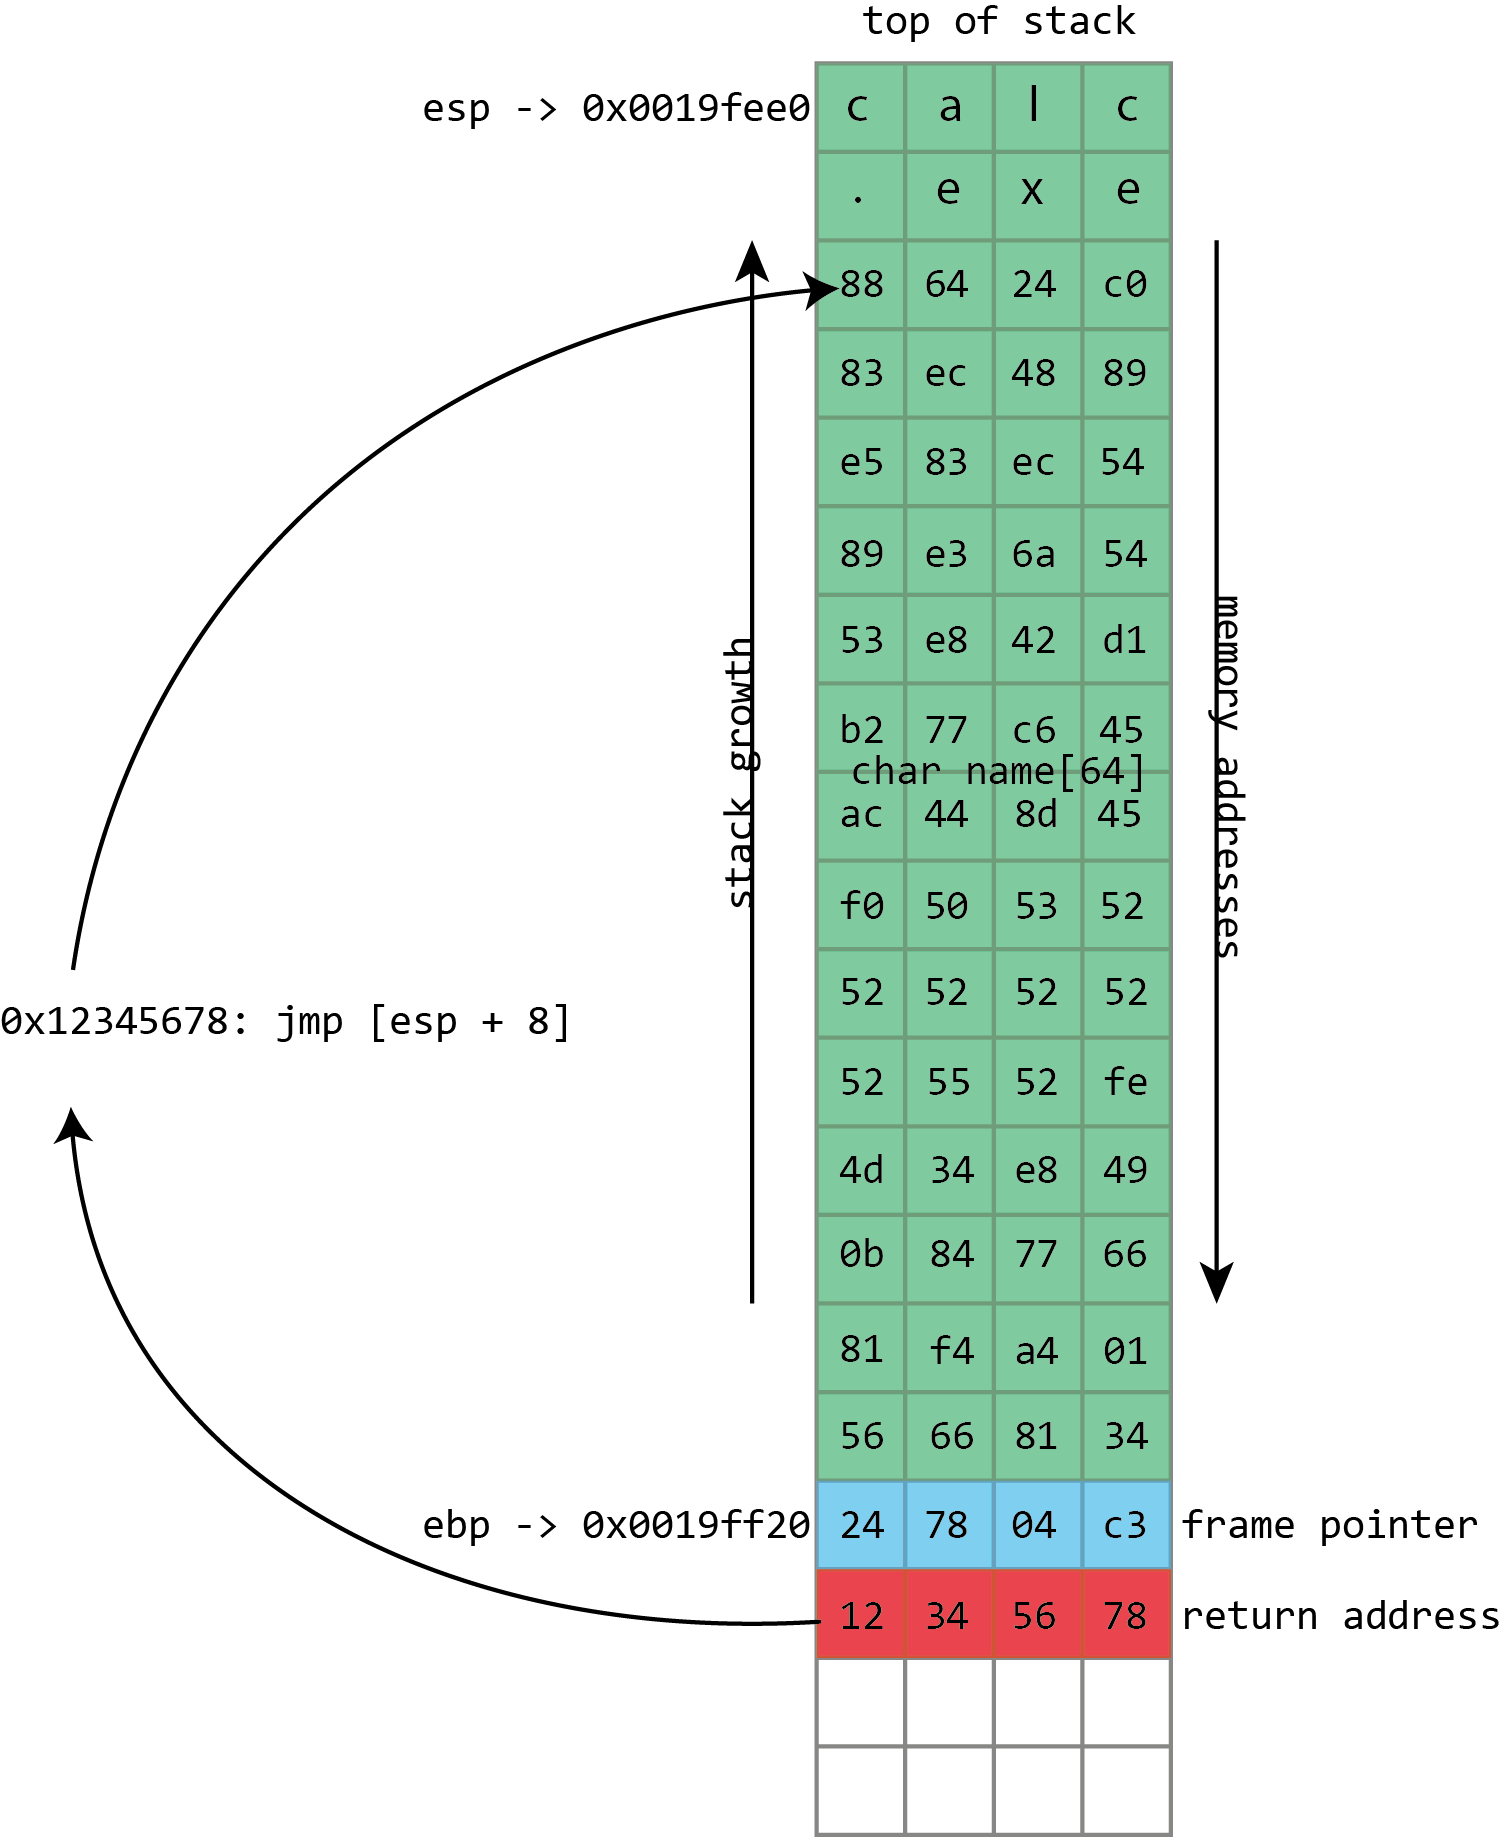
What the attacker has to do is find a usable address that contains an instruction such as x86’s call esp, which treats the value of the stack pointer as the address of a function and begins executing it—a perfect match for a stack buffer that contains the shellcode. The attacker then uses the address of the call esp instruction to overwrite the return address; the processor will take an extra hop through this address but still end up running the shellcode. This technique of bouncing through another address is called “trampolining.”
Sometimes it can be difficult to overwrite the return address with the address of the buffer. To handle this, we can overwrite the return address with the address of a piece of executable code found within the victim program (or its libraries). This fragment of code will transfer execution to the buffer for us.
This works because, again, the program and all its libraries occupy the same memory addresses every time they run—even across reboots and even across different machines. One of the interesting things about this is that the library that provides the trampoline does not need to ever perform a call esp itself. It just needs to offer the two bytes (in this case 0xff and 0xd4) adjacent to each other. They could be part of some other instruction or even a literal number; x86 isn’t very picky about this kind of thing. x86 instructions can be very long (up to 15 bytes!) and can be located at any address. If the processor starts reading an instruction from the middle—from the second byte of a four byte instruction, say—the result can often be interpreted as a completely different, but still valid, instruction. This can make it quite easy to find useful trampolines.
Sometimes, however, the attack can’t set the return address to exactly where it needs to go. Although the memory layout is very similar, it might vary slightly from machine to machine or run to run. For example, the precise location of an exploitable buffer might vary back and forth by a few bytes depending on the system’s name or IP address, or because a minor update to the software has made a very small change. To handle this, it’s useful to be able to specify a return address that’s roughly correct but doesn’t have to be exactly correct.
This can be handled easily through a technique called the “NOP sled.” Instead of writing the shellcode directly into the buffer, the attacker writes a large number of “NOP” instructions (meaning “no-op”; they’re instructions that don’t actually do anything), sometimes hundreds of them, before the real shellcode. To run the shellcode, the attacker only needs to set the return address to somewhere among these NOP instructions. As long as they land within the NOPs, the processor will quickly run through them until it reaches the real shellcode.
Blame C
The core bug that enables these attacks, writing more to a buffer than the buffer has space for, sounds like something that should be simple to avoid. It’s an exaggeration (but only a slight one) to lay the blame entirely on the C programming language and its more or less compatible offshoots, namely C++ and Objective-C. The C language is old, widely used, and essential to our operating systems and software. It’s also appallingly designed, and while all these bugs are avoidable, C does its damnedest to trip up the unwary.
As an example of C’s utter hostility to safe development, consider the function gets(). The gets() function takes one parameter—a buffer—and reads a line of data from standard input (which normally means “the keyboard”), then puts it into the buffer. The observant may have noticed that gets() doesn’t include a parameter for the buffer’s size, and as an amusing quirk of C’s design, there’s no way for gets() to figure out the buffer’s size for itself. And that’s because gets() just doesn’t care: it will read from standard input until the person at the keyboard presses return, then try to cram everything into the buffer, even if the person typed far more than the buffer could ever contain.
This is a function that literally cannot be used safely. Since there’s no way of constraining the amount of text typed at the keyboard, there’s no way of preventing gets() from overflowing the buffer it is passed. The creators of the C standard did soon realize the problem; the 1999 revision to the C specification deprecated gets(), while the 2011 update removed it entirely. But its existence—and occasional usage—is a nice indication of the kind of traps that C will spring on its users.
The Morris worm, the first self-replicating malware that spread across the early Internet in a couple of days in 1988, exploited this function. The BSD 4.3 fingerd program listened for network connections on port 79, the finger port. finger is an ancient Unix program and corresponding network protocol used to see who’s logged in to a remote system. It can be used in two ways; a remote system can be queried to see everyone currently logged in. Alternatively, it can be queried about a specific username, and it will tell you some information about that user.
Whenever a connection was made to the finger daemon, it would read from the network—using gets()—into a 512 byte buffer on the stack. In normal operation, fingerd would then spawn the finger program, passing it the username if there was one. The finger program was the one that did the real work of listing users or providing information about any specific user. fingerd was simply responsible for listening to the network and starting finger appropriately.
Given that the only “real” parameter is a possible username, 512 bytes is plainly a huge buffer. Nobody is likely to have a username anything like that long. But no part of the system actually enforced that constraint because of the use of the awful gets() function. Send more than 512 bytes over the network and fingerd would overflow its buffer. So this is exactly what Robert Morris did: his exploit sent 537 bytes to fingerd (536 bytes of data plus a new-line character, which made gets() stop reading input), overflowing the buffer and overwriting the return address. The return address was set simply to the address of the buffer on the stack.
The Morris worm’s executable payload was simple. It started with 400 NOP instructions, just in case the stack layout was slightly different, followed by a short piece of code. This code spawned the shell, /bin/sh. This is a common choice of attack payload; the fingerd program ran as root, so when it was attacked to run a shell, that shell also ran as root. fingerd was plumbed into the network, taking its “keyboard input” from the network and likewise sending its output back over the network. Both of these features are inherited by the shell executed by the exploit, meaning that the root shell was now usable remotely by the attacker.
While gets() is easy to avoid—in fact, even at the time of the Morris worm, a fixed version of fingerd that didn’t use gets() was available—other parts of C are harder to ignore and no less prone to screw ups. C’s handling of text strings is a common cause of problems. The behavior mentioned previously—stopping at null bytes—comes from C’s string behavior. In C, a string is a sequence of characters, followed by a null byte to terminate the string. C has a range of functions for manipulating these strings. Perhaps the best pair are strcpy(), which copies a string from a source to a destination, and strcat(), which appends a source string to a destination. Neither of these functions has a parameter for the size of the destination buffer. Both will merrily read from their source forever until they reach a null character, filling up the destination and overflowing it without a care in the world.
Even when C’s string handling functions do take a parameter for the buffer size, they can do so in a way that leads to errors and overflows. C offers a pair of siblings to strcat() and strcpy() called strncat() and strncpy(). The extra n in their names denotes that they take a size parameter, of sorts. But n is not, as many naive C programmers believe, the size of the buffer being written to; it is the number of characters from the source to copy. If the source runs out of characters (because a null byte is reached) then strncpy() and strncat() will make up the difference by copying more null bytes to the destination. At no point do the functions ever care about the actual size of the destination.
Unlike gets(), it is possible to use these functions safely; it’s just difficult. C++ and Objective-C both include superior alternatives to C’s functions, making string manipulation much simpler and safer, but they retain the old C capabilities for reasons of backwards compatibility.
Moreover, they retain C’s fundamental weakness: buffers do not know their own size, and the language never validates the reads and writes performed on buffers, allowing them to overflow. This same behavior also led to the recent Heartbleed bug in OpenSSL. That wasn’t an overflow; it was an overread; the C code in OpenSSL tried to read more from a buffer than the buffer contained, leaking sensitive information to the world.
Fixing the leaks
Needless to say, it is not beyond the wit of mankind to develop languages in which reads from and writes to buffers are validated and so can never overflow. Compiled languages such as the Mozilla-backed Rust, safe runtime environments such as Java and .NET, and virtually every scripting language like Python, JavaScript, Lua, Python, and Perl are immune to this problem (although .NET does allow developers to explicitly turn off all the safeguards and open themselves up to this kind of bug once more should they so choose).
That the buffer overflow continues to be a feature of the security landscape is a testament to C’s enduring appeal. This is in no small part due to the significant issue of legacy code. An awful lot of C code still exists, including the kernel of every major operating system and popular libraries such as OpenSSL. Even if developers want to use a safe language such as C#, they may need to depend on a third-party library written in C.
Performance arguments are another reason for C’s continued use, though the wisdom of this approach was always a little unclear. It’s true that compiled C and C++ tend to produce fast executables, and in some situations that matters a great deal. But many of us have processors that spend the vast majority of their time idling; if we could sacrifice, say, ten percent of the performance of our browsers in order to get a cast iron guarantee that buffer overflows—in addition to many other common flaws—were impossible, we might decide that would be a fair trade-off, if only someone were willing to create such a browser.
Nonetheless, C and its friends are here to stay; as such, so are buffer overflows.
Some effort is made to stop the overflow errors before they bite anyone. During development there are tools that can analyze source code and running programs to try to detect dangerous constructs or overflow errors before those bugs ever make their way into shipping software. New tools such as AddressSantizer and older ones such as Valgrind both offer this kind of capability.
However, these tools both require the active involvement of the developer, meaning not all programs use them. Systemic protections that strive to make buffer overflows less dangerous when they do occur can protect a much greater variety of software. In recognition of this, operating system and compiler developers have implemented a number of systems to make exploiting these overflows harder.
Some of these systems are intended to make specific attacker tasks harder. One set of Linux patches made sure that system libraries were all loaded at low addresses to ensure that they contained at least one null byte in their address; this makes it harder to use their addresses in any overflow that uses C string handling.
Other defenses are more general. Many compilers today have some kind of stack protection. A runtime-determined value known as a “canary” is written onto the end of the stack near where the return address is stored. At the end of every function, that value is checked for modification before the return instruction is issued. If the canary value has changed (because it has been overwritten in a buffer overflow) then the program will immediately crash rather than continue.
Perhaps the most important single protection is one variously known as W^X (“write exclusive-or execute”), DEP (“data execution prevention”), NX (“No Xecute”), XD (“eXecute Disable”), EVP (“Enhanced Virus Protection,” a rather peculiar term sometimes used by AMD), XN (“eXecute Never”), and probably more. The principle here is simple. These systems strive to make memory either writeable (suitable for buffers) or executable (suitable for libraries and program code) but not both. Thus, even if an attacker can overflow a buffer and control the return address, the processor will ultimately refuse to execute the shellcode.
Whichever name you use, this is an important technique not least because it comes at essentially no cost. This approach leverages protective measures built into the processor itself as part of the hardware support for virtual memory.
As described before, with virtual memory every process gets its own set of private memory addresses. The operating system and processor together maintain a mapping from virtual addresses to something else; sometimes a virtual address corresponds to a physical memory address, sometimes it corresponds to a portion of a file on disk, and sometimes it corresponds to nothing at all because it has not been allocated. This mapping is granular, typically using 4,096 byte chunks called pages.
The data structures used to store the mapping don’t just include the location (physical memory, disk, nowhere) of each page; they also contain (usually) three bits defining the page’s protection: whether the page is readable, whether it is writeable, and whether it is executable. With this protection, areas of the process’ memory that are used for data, such as the stack, can be marked as readable and writeable but not executable. Conversely, areas such as the program’s executable code and libraries can be marked as readable and executable but not writeable.
One of the great things about NX is that it can be applied to existing programs retroactively just by updating the operating system to one that supports it. Occasionally programs do run into problems. Just-in-time compilers, used for things like Java and .NET, generate executable code in memory at runtime, and as such need memory that is both writeable and executable (though strictly, they don’t need it to be both things simultaneously). In the days before NX, any memory that was readable was also executable, so these JIT compilers never had to do anything special to their read-writeable buffers. With NX, they need to make sure to change the memory protection from read-write to read-execute.
The need for something like NX was clear, especially for Microsoft. In the early 2000s, a pair of worms showed that the company had some serious code security problems: Code Red, which infected as many as 359,000 Windows 2000 systems running Microsoft’s IIS Web server in July 2001, and SQL Slammer, which infected more than 75,000 systems running Microsoft’s SQL Server database in January 2003. These were high-profile embarrassments.
Both of them exploited stack buffer overflows, and strikingly, though they came 13 and 15 years after the Morris worm, the method of exploitation was virtually identical. An exploit payload was placed into the buffer on the stack and the return address overwritten to execute it. (The only slight nuance was that both of these used the trampoline technique. Instead of setting the return address directly to the address of the stack, they set the return address to an instruction that in turn passes execution to the stack.)
Naturally, these worms were also advanced in other ways. Code Red’s payload didn’t just self-replicate; it also defaced webpages and attempted to perform denial of service attacks. SQL Slammer packed everything it needed to find new machines to exploit and spread through a network in just a few hundred bytes, and it left no footprint on machines it infected; reboot and it was gone. Both worms also worked on an Internet that was enormously larger than the one the Morris worm worked with, and hence they infected many more machines.
But the central issue, that of a straightforwardly exploitable stack buffer overflow, was an old one. These worms were both major news and made many people question the use of Windows in any kind of an Internet-facing, server capacity. Microsoft’s response was to start taking security seriously. Windows XP Service Pack 2 was the first real product with this mindset. It utilized a number of software changes, including a software firewall, changes to Internet Explorer to prevent silent installation of toolbars, plugins—and NX support.
Hardware supporting NX has been mainstream since 2004, when Intel introduced the Prescott Pentium 4, and operating system support for NX has been widespread since Windows XP Service Pack 2. Windows 8 forced the issue even more by cutting off support for older processors that didn’t have NX hardware.
Beyond NX
In spite of the spread of NX support, buffer overflows remain a security issue to this day. That’s because a number of techniques were devised to bypass NX.
The first of these was similar to the trampolining trick already described to pass control to the shellcode in a stack buffer via an instruction found in another library or executable. Instead of looking for a fragment of executable code that will pass execution directly back to the stack, the attacker looks for a fragment that does something useful in its own right.
Perhaps the best candidate for this is the Unix system() function. system() takes one parameter: the address of a string representing a command line to be executed, and traditionally that parameter is passed on the stack. The attacker can create a command-line string and put it in the buffer to be overflowed, and because (traditionally) things didn’t move around in memory, the address of that string would be known and could be put on the stack as part of the attack. The overwritten return address in this situation isn’t set to the address of the buffer; it’s set to the address of the system() function. When the function with the buffer overflow finishes, instead of returning to its caller, it runs the system() function to execute a command of the attacker’s choosing.
This neatly bypasses NX. The system() function, being part of a system library, is already executable. The exploit doesn’t have to execute code from the stack; it just has to read the command line from the stack. This technique is called “return-to-libc” and was invented in 1997 by Russian computer security expert Solar Designer. (libc is the name of the Unix library that implements many key functions, including system(), and is typically found loaded into every single Unix process, so it makes a good target for this kind of thing.)
While useful, this technique can be somewhat limited. Often functions don’t take their arguments from the stack; they expect them to be passed in registers. Passing in command-line strings to execute is nice, but it often involves those annoying nulls, which can foul everything up. Moreover, it makes chaining multiple function calls very difficult. It can be done—provide multiple return addresses instead of one—but there’s no provision for changing the order of arguments, using return values, or anything else.
Instead of filling the buffer with shellcode, we fill it with a sequence of return addresses and data. These return addresses pass control to existing fragments of executable code within the victim program and its libraries. Each fragment of code performs an operation and then returns, passing control to the next return address.
Over the years, return-to-libc was generalized to alleviate these restrictions. In late 2001, a number of ways to extend return-to-libc to make multiple function calls was documented, along with solutions for the null byte problem. These techniques were nonetheless limited. A more complicated technique formally described in 2007 for the most part lifted all these restrictions: return-oriented-programming (ROP).
This used the same principle as from return-to-libc and trampolining but generalized further still. Where trampolining uses a single fragment of code to pass execution to shellcode in a buffer, ROP uses lots of fragments of code, called “gadgets” in the original ROP paper. Each gadget follows a particular pattern: it performs some operation (putting a value in a register, writing to memory, adding two registers, etc.) followed by a return instruction. The same property that makes x86 good for trampolining works here too; the system libraries loaded into a process contain many hundreds of sequences that can be interpreted as “perform an action, then return” and hence can be used in ROP-based attacks.
The gadgets are all chained together by a long sequence of return addresses (and any useful or necessary data) written to the stack as part of the buffer overflow. The return instructions leap from gadget to gadget with the processor rarely or never calling functions, only ever returning from them. Remarkably, it was discovered that, at least on x86, the number and variety of useful gadgets is such that an attacker can generally do anything; this weird subset of x86, used in a peculiar way, is often Turing complete (though the exact range of capabilities will depend on which libraries a given program has loaded and hence which gadgets are available).
As with return-to-libc, all the actual executable code is taken from system libraries, and so NX protection is useless. The greater flexibility of the approach means that exploits can do the things that are difficult even with chained return-to-libc, such as calling functions that take arguments in registers, using return values from one function as an argument for another, and much more besides.
The ROP payloads vary. Sometimes they’re simple “create a shell”-style code. Another common option is to use ROP to call a system function to change the NX state of a page of memory, flipping it from being writable to being executable. Doing this, an attacker can use a conventional, non-ROP payload, using ROP only to make the non-ROP payload executable.
Getting random
This weakness of NX has long been recognized, and a recurring theme runs throughout all these exploits: the attacker knows the memory addresses of the stack and system libraries ahead of time. Everything is contingent on this knowledge, so an obvious thing to try is removing that knowledge. This is what Address Space Layout Randomization (ASLR) does: it randomizes the position of the stack and the in-memory location of libraries and executables. Typically these will change either every time a program is run, every time a system is booted, or some combination of the two.
This greatly increases the difficulty of exploitation, because all of a sudden, the attacker doesn’t know where the ROP instruction fragments will be in memory, or even where the overflowed stack buffer will be.
ASLR in many ways goes hand in hand with NX, because it shores up the big return-to-libc and return-oriented-programming gaps that NX leaves. Unfortunately, it’s a bit more intrusive than NX. Except for JIT compilers and a few other unusual things, NX could be safely added to existing programs. ASLR is more problematic; programs and libraries need to ensure that they do not make any assumptions about the address they’re loaded at.
On Windows, for example, this shouldn’t be a huge issue for DLLs. DLLs on Windows have always supported being loaded at different addresses, but it could be an issue for EXEs. Before ASLR, EXEs would always be loaded at an address of 0x0040000 and could safely make assumptions on that basis. After ASLR, that’s no longer the case. To make sure that there won’t be any problems, Windows by default requires executables to indicate that they specifically support ASLR and opt in to enabling it. The security conscious can, however, force Windows to enable it for all executables and libraries even if programs don’t indicate that they support it. This is almost always fine.
The situation is perhaps worse on x86 Linux, as the approach used for ASLR on that platform exacts a performance cost that may be as high as 26 percent. Moreover, this approach absolutely requires executables and libraries to be compiled with ASLR support. There’s no way for an administrator to mandate the use of ASLR as there is in Windows. (x64 does not quite eliminate the performance cost of the Linux approach, but it does greatly alleviate it.)
When ASLR is enabled, it provides a great deal of protection against easy exploitation. ASLR still isn’t perfect, however. For example, one restriction is the amount of randomness it can provide. This is especially acute on 32-bit systems. Although the memory space has more than 4 billion different addresses, not all of those addresses are available for loading libraries or placing the stack.
Instead, it’s subject to various constraints. Some of these are broad goals. Generally, the operating system likes to keep libraries loaded fairly close together at one end of the process’ address space, so that as much contiguous empty space is available to the application as possible. You wouldn’t want to have one library loaded every 256MB throughout the memory space, because the biggest single allocation you’d be able to make would be a little less than 256MB, which limits the ability of applications to work on big datasets.
Executables and libraries generally have to be loaded so that they start on, at the very least, a page boundary. Normally, this means they must be loaded at an address that’s a multiple of 4,096. Platforms can have similar conventions for the stack; Linux, for example, starts the stack on a multiple of 16 bytes. Systems under memory stress sometimes have to further reduce the randomness in order to fit everything in.
The impact of this varies, but it means that attackers can sometimes guess what an address will be and have a reasonable probability of guessing right. Even a fairly low chance—one in 256, say—can be enough in some situations. When attacking a Web server that will automatically restart crashed processes, it may not matter that 255 out of 256 attacks crash the server. It will simply be restarted, and the attacker can try again.
But on 64-bit systems, there’s so much address space that this kind of guessing approach is untenable. The attacker could be stuck with a one in a million or one in a billion chance of getting it right, and that’s a small enough chance as to not matter.
Guessing and crashing isn’t much good for attacks on, say, browsers; no user is going to restart a browser 256 times in a row just so that an attacker can strike it lucky. As a result, exploiting this kind of flaw on a system with both NX and ASLR can’t be done without help.
This help can come in many forms. One route in browsers is to use JavaScript or Flash—both of which contain JIT compilers that generate executable code—to fill large portions of memory with carefully constructed executable code. This produces a kind of large-scale NOP sled in a technique known as “heap spraying.” Another approach is to find a secondary bug that inadvertently reveals memory addresses of libraries or of the stack, giving the attacker enough information to construct a custom set of ROP return addresses.
A third approach was again common in browsers: take advantage of libraries that don’t use ASLR. Old versions of, for example, Adobe’s PDF plugin or Microsoft’s Office browser plugins didn’t enable ASLR, and Windows by default doesn’t force ASLR on non-ASLR code. If attackers could force such a library to load (by, for example, loading a PDF into a hidden browser frame) then they no longer needed to be too concerned about ASLR; they could just use that non-ASLR library for their ROP payload.
A never-ending war
The world of exploitation and mitigation techniques is one of cat and mouse. Powerful protective systems such as ASLR and NX raise the bar for taking advantage of flaws and together have put the days of the simple stack buffer overflow behind us, but smart attackers can still combine multiple flaws to defeat these protections.
The escalation continues. Microsoft’s EMET (“Enhanced Mitigation Experience Toolkit”) includes a range of semi-experimental protections that try to detect heap spraying or attempts to call certain critical functions in ROP-based exploits. But in the continuing digital arms war, even these have security techniques that have been defeated. This doesn’t make them useless—the difficulty (and hence cost) of exploiting flaws goes up with each new mitigation technique—but it’s a reminder of the need for constant vigilance.
Thanks to Melissa Elliott for her invaluable feedback.
This self-contained library is intended to aid in parsing dates and time values regardless of incoming format, and output the result to a uniform format of choice.
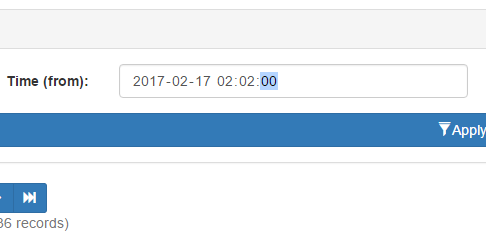
The simple fact is that client side inputs are notoriously unreliable. Even when enforcing inputs to choose or sanitize dates, you may not end up with uniform results across browsers. Or even the SAME browser. Google Chrome for instance, will send a different format depending upon seconds input. Even if you enforce seconds using the step attribute, Chrome will not send seconds as part of the date time string if the user chooses a seconds value of 00.
Unless you choose a value of 01 or greater, Chrome simply won’t include seconds.
However, should you choose a seconds value of 01 or more, then Chrome WILL include the seconds when posting. Same browser. Same version. Same field attributes. Yet entirely different formats depending on perfectly valid user inputs.
You could choose to use text fields and invoke heavy JavaScript date/time pickers, but then you harm the mobile experience, where seamless date choosing is already implemented. If you choose a dynamic solution that looks for support of date time fields, then you regain the mobile experience, but you’re right back to dealing with unreliable formatting.
In a nutshell, if you don’t perform server side validation, you may wind up with undefined behavior from whatever code relies on the input. Databases are particularly finicky. Go ahead and send client side dates directly to an RDMS. Your results will be the same as Forrest Gump’s chocolate box.
Unfortunately, most forms of server side validation are themselves rather persnickety. In the above example, a validator expecting seconds will reject input from Chrome, and several mobile browsers as well. This is where my date and time library comes into play. By leveraging a layered approach and PHP’s string to time, we can accept most any valid time string, verify it, and output in a single uniform format for use.
Use
Simple – Object is initialized with default settings:
// Initialize object with default settings.
$dc_time 		= new dc\Chronofix();
Advanced – Initializing a settings object first, and applying it to the main object.
// Initialize settings object, and use it
// to set date format to Year-Month-Day only.
$dc_time_settings = new dc\Config()
(); $dc_time_settings->set_format('Y-m-d'); // Initialize time library with settings. $dc_time = new dc\Chronofix($dc_time_settings);
Once initialized the following functions are exposed. All examples assume default settings.
$string = '2017-02-15 12:00:00';

echo $time->is_valid($string);

// Outputs TRUE if valid, or FALSE.
For internal use, but exposed for possible utility purposes. Evaluates $string against current date/time format. If the formats match, TRUE is returned. Otherwise FALSE is returned.
Evaluates the current date/time value and attempts to convert its format to the current format setting. Leverages a combination of php’s strtotime and date object to handle nearly any format of dates and times. Outputs newly formatted date/time string, or NULL on failure.
$object = new dc\Config();

$time->set_settings($object);
Scripting experiment. Inspector Blair page layout is currently static code. I would like to upgrade to a content managed layout. One of the first challenges is overcoming the diverse array of forms and subsequent data calls. Dynamic queries are NOT acceptable. Instead I’ll need to find a way to create dynamic inputs for stored procedures that can be driven from a forms database.
This experiment was to test a simple array generator. Normally saving to the database is handled by a set of class calls as in this excerpt:
case RECORD_NAV_COMMANDS::SAVE:

	// Stop errors in case someone tries a direct command link.
	if($obj_navigation_rec->get_command() != RECORD_NAV_COMMANDS::SAVE) break;

	// Save the record. Saving main record is straight forward. We’ll run the populate method on our
	// main data object which will gather up post values. Then we can run a query to merge the values into
	// database table. We’ll then get the id from saved record (since we are using a surrogate key, the ID
	// should remain static unless this is a brand new record).

	// If necessary we will then save any sub records (see each for details).

	// Finally, we redirect to the current page using the freshly acquired id. That will ensure we have
	// always an up to date ID for our forms and navigation system.

	// Populate the object from post values.
	$_main_data->populate_from_request();

	// --Sub data: Role.
	$_obj_data_sub_request = new class_account_role_data();
	$_obj_data_sub_request->populate_from_request();

	// Let's get account info from the active directory system. We'll need to put
	// names int our own database so we can control ordering of output.
	$account_lookup = new class_access_lookup();
	$account_lookup->lookup($_main_data->get_account());

	// Call update stored procedure.
	$query->set_sql('{call account_update(@id			= ?,
											@log_update_by	= ?,
											@log_update_ip 	= ?,
											@account 		= ?,
											@department 	= ?,
											@details		= ?,
											@name_f			= ?,
											@name_l			= ?,
											@name_m			= ?,
											@sub_role_xml	= ?)}');

	$params = array(array('<root><row id="'.$_main_data->get_id().'"/></root>', 		SQLSRV_PARAM_IN),
				array($access_obj->get_id(), 				SQLSRV_PARAM_IN),
				array($access_obj->get_ip(), 			SQLSRV_PARAM_IN),
				array($_main_data->get_account(), 		SQLSRV_PARAM_IN),
				array($_main_data->get_department(),	SQLSRV_PARAM_IN),
				array($_main_data->get_details(), 		SQLSRV_PARAM_IN),
				array($account_lookup->get_account_data()->get_name_f(), SQLSRV_PARAM_IN),
				array($account_lookup->get_account_data()->get_name_l(), SQLSRV_PARAM_IN),
				array($account_lookup->get_account_data()->get_name_m(), SQLSRV_PARAM_IN),
				array($_obj_data_sub_request->xml(), 	SQLSRV_PARAM_IN));

	//var_dump($params);
	//exit;

	$query->set_params($params);
	$query->query();

	// Repopulate main data object with results from merge query.
	$query->get_line_params()->set_class_name('blair_class_account_data');
	$_main_data = $query->get_line_object();

	// Now that save operation has completed, reload page using ID from
	// database. This ensures the ID is always up to date, even with a new
	// or copied record.
	header('Location: '.$_SERVER['PHP_SELF'].'?id='.$_main_data->get_id());

	break;
Before we can begin to control the above calls dynamically, we’ll need to break the call down and see if we can assemble the sql string. Here we will concentrate on building the SQL string.
The form parts and column names they send data too will likely be stored in a sub-table of the forms database, and output as a linked list. We need to use those column names in a call string for sending or retrieving data. This simple experiment uses a keyed array to simulate the list we might get and see if we can concatenate a usable stored procedure call string.
$_main_data->populate_from_request();

// --Sub data: Role.
$_obj_data_sub_request = new class_account_role_data();
$_obj_data_sub_request->populate_from_request();

// Let's get account info from the active directory system. We'll need to put
// names int our own database so we can control ordering of output.
$account_lookup = new class_access_lookup();
$account_lookup->lookup($_main_data->get_account());

$save_row['id']                = '<root><row id="'.$_main_data->get_id().'"/></root>';
$save_row['log_update_by']    = $access_obj->get_id();
$save_row['log_update_ip']     = $access_obj->get_ip();
$save_row['account']         = $_main_data->get_account();
$save_row['department']        = $_main_data->get_department();
$save_row['name_f']         = $account_lookup->get_account_data()->get_name_f();
$save_row['name_l']         = $account_lookup->get_account_data()->get_name_l();
$save_row['name_m']         = $account_lookup->get_account_data()->get_name_m();
$save_row['sub_role_xml']     = $_obj_data_sub_request->xml();

$sql_str = '{call account_update(@';
$sql_str .= implode(' = ?, @', array_keys($save_row));
$sql_str .= ')}';
echo $sql_str;

//
Obviously this alone won’t be enough, but the resulting output looks quite promising:
This function will scan directories and return keyed arrays of file attributes matching a user provided filter string. Perfect for image, documents, and other sorts of content delivery where a naming convention is known but the directory contents are often appended or otherwise in flux.
Example
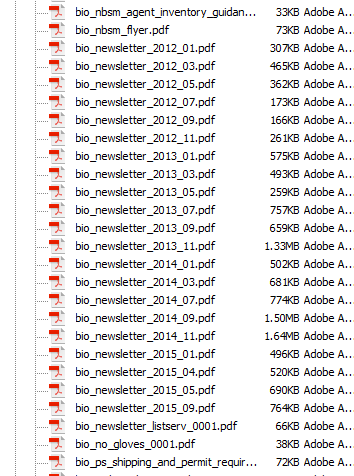
Let’s assume we need to locate a series of .pdf newsletters. Occasionally these letters are uploaded to the web server with a big endian date based naming convention.
The documents we need might be part of a larger container with many other items.
Since we know each file begins with “bio_newsletter_”, we can use that as our search string, like this:
The function will then rummage through our target directory, and return an array with any matched files, giving you an output that looks something like this:
Key
Value
/docs/pdf/bio_newsletter_2015_09.pdf
/docs/pdf/bio_newsletter_2015_09.pdf
/docs/pdf/bio_newsletter_2015_05.pdf
/docs/pdf/bio_newsletter_2015_05.pdf
/docs/pdf/bio_newsletter_2015_04.pdf
/docs/pdf/bio_newsletter_2015_04.pdf
…
This might look redundant, but that’s because keys are always populated with file name to allow extraction of values by name later, and in this case we are looking specifically for the file name. There is an option of returning one of several attributes, which are reflected in the value.
If the directory does not exist or isn’t readable, the function will return NULL.
Source
// Caskey, Damon V.
// 2012-03-19
//
// Scan a directory for files matching filter
// and return an array of matches.
//
// $directory: 		Directory to scan.
// $filter:		Filter string.
// $attribute:		File attribute to acquire. See here for
// 			list of available attributes: http://php.net/manual/en/function.stat.php
// $order_descending:	FALSE (default) = Order by file name ascending.
//			TRUE = Order by file name descending.
function directory_scan($directory, $filter, $attribute = 'name', $order_descending = FALSE)
{
    $result 			= NULL;	// Final result.
    $directory_handle 	= NULL; 	// Directory object handle.
	$directory_valid	= FALSE;	// If directory is accessible.
	$stat				= array();	// Attribute array.

	// Validate directory.
	$directory_valid = is_readable($directory);

	// If the directory is valid, open it
	// and get the object handle.
	if($directory_valid)
	{
		$directory_handle = opendir($directory);
	}

	// Do we have a directory handle?
	if($directory_handle)
	{
		// Scan all items in directory
		// and populate result array with
		// the attribute of those with
		// names matching our search pattern.
        do
		{
			// Get first/next item name in the
			// directory handle.
			$file_name = readdir($directory_handle);


            if (preg_match($filter, $file_name))
			{
                $stat = stat($directory.'/'.$file_name);

				// If requested attribute is name, then
				// just pass on the name with directory.
				// Otherwise, pass the requested attribute.
				if($attribute == 'name')
				{
					$result[$file_name] = $file_name;
				}
				else
				{
					$result[$file_name] = $stat[$attribute];
				}
            }

        }
		while($file_name !== FALSE);

		// Close the directory object.
		closedir($directory_handle);

		// Sort the array as requested.
		if ($order_descending)
		{
            arsort($result);
        }
        else
		{
            asort($result);
        }
    }

	// Return resulting array.
    return $result;
}
A word of caution – directory scanning is simple and effective, but doesn’t scale so well. A few hundred files is fine, but once you start breaching the thousands it’s probably time to break your directory structure down a bit, or consider a RDMS solution.
Opening a model is well documented for the bootstrap framework, assuming the model’s contents are located within the same document. However, if the model target is a remote file the process becomes slightly more nebulous. After some experimenting and Stack Overflow research I have compiled the following steps to do so.
Link
The link for opening a model must still target a container element of some sort, typically a DIV id. You may also choose to target the container by class. For remote files, you need to include a href as well, targeting the remote file location.
Next you need to prepare the calling document (the same document that contains model link) with a model container. This is exactly the same as with a normal model, except you are only adding the model’s container elements, not its content.
<div class="modal fade" id="#model_div_container_id">
    <div class="modal-dialog">
        <div class="modal-content">
        	<!-- Model content area - leave this empty.-->
        </div>
    </div>
</div>
Model Document (Content)
The last step is to prepare your remote document. Add whatever content you wish. The only special caveat to consider is you do NOT add the model container elements to this document. You only add the content. The content itself may include its own container elements, formatting, and so forth. In the example below, the model is a simple list, and therefore only the markup for the list is included.
You’ve probably already guessed what’s going on here. When the model link is clicked, the remote document’s contents are inserted into the calling document’s target element. Bootstrap Model Documentation (extracted 2017-01-23):
If a remote URL is provided, content will be loaded one time via jQuery’s load method and injected into the .modal-content div. If you’re using the data-api, you may alternatively use the href attribute to specify the remote source.
This is why you must include a target element in the calling document, and conversely NOT include model containers in the remote document. Hope this helps. Special thanks to Buzinas from Stack Overflow.
Paging is almost perfunctory when dealing with large lists of online data. Problem is, most paging solutions out there (at least those I’ve seen) perform this vital function on the client side – either through dangerous dynamic SQL or even worse – pulling the entire record set down and disseminating pages for the user afterward.
You wouldn’t (I hope) trust the client to put data into your tables, so why trust it to filter and page? That’s what your database engine was specifically designed to do! Server side paging gives you a couple of big advantages:
Security – See above. I would never, and will never trust a client generated SQL. You’re just asking for it.
Scaling – Client side record processing may seem faster at first because of the instant response. Then your record count passes the VERY modest six digit mark, and suddenly you’re looking for ways to mediate ten minute load times.
The only real downsides to sever side paging are reloading and complexity of initial setup. The former can be dealt with using an AJAX or similar solution. The later is where I come in. The following stored procedure completely encapsulates paging, all of any other data extraction.
Implementation
Execute within data procedure after all other record processing is complete on the primary data table. Assumes primary data is in temp table #cache_primary. Pass following arguments:
page_current – Current record page to view as requested by control code.
page_rows (optional, uses default value if NULL) – Number of rows (records) to output per page.
Outputs following record set for use by control code:
Column
Type
Description
row_count_total
int
Total number of rows in the paged record set.
page_rows
int
Maximum number of rows per page. Will be same as the maximum row argument passed form control code unless that argument was null, in which case this will reflect the default maximum rows.
page_last
int
Last page number / total number of pages.
row_first
int
ID of first record in requested page.
row_last
int
ID of last record in requested page.
SQL
-- Master Paging
-- Caskey, Damon V.
-- 2016-07-08
--
-- Output recordset in divided pages. Also creates and outputs
-- a recordset of paging data for  control code. Execute in another
-- stored procedure after all other record work (filters, sorting, joins, etc.)
-- is complete. Make sure final table variable name is #cache_primary.

-- Set standard ISO behavior for handling NULL
-- comparisons and quotations.
ALTER PROCEDURE [dbo].[master_paging]

    -- Parameters.
        @param_page_current    int            = 1,    -- Current page of records to display.
        @param_page_rows    smallint    = 25    -- (optional) max number of records to display in a page.

AS
BEGIN

    -- If non paged layout is requested (current = -1), then just
    -- get all records and exit the procedure immediately.
        IF @param_page_current = -1
            BEGIN
                SELECT *
                    FROM #cache_primary
                    RETURN
            END

    -- Verify arguments from control code. If something
    -- goes out of bounds we'll use stand in values. This
    -- also lets the paging "jumpstart" itself without
    -- needing input from the control code.

        -- Current page default.
        IF    @param_page_current IS NULL OR @param_page_current < 1
            SET @param_page_current = 1

        -- Rows per page default.
        IF    @param_page_rows IS NULL OR @param_page_rows < 1 SET @param_page_rows = 10 -- Declare the working variables we'll need. DECLARE @row_count_total int, -- Total row count of primary table. @page_last float, -- Number of the last page of records. @row_first int, -- Row ID of first record. @row_last int -- Row ID of last record. -- Set up table var so we can reuse results. CREATE TABLE #cache_paging ( id_row int, id_paging int ) -- Populate paging cache. This is to add an -- ordered row number column we can use to -- do paging math. INSERT INTO #cache_paging (id_row, id_paging) (SELECT ROW_NUMBER() OVER(ORDER BY @@rowcount) AS id_row, id FROM #cache_primary _main) -- Get total count of records. SET @row_count_total = (SELECT COUNT(id_row) FROM #cache_paging); -- Get paging first and last row limits. Example: If current page -- is 2 and 10 records are allowed per page, the first row should -- be 11 and the last row 20. SET @row_first = (@param_page_current - 1) * @param_page_rows SET @row_last = (@param_page_current * @param_page_rows + 1); -- Get last page number. SET @page_last = (SELECT CEILING(CAST(@row_count_total AS FLOAT) / CAST(@param_page_rows AS FLOAT))) IF @page_last = 0 SET @page_last = 1 -- Extract paged rows from page table var, join to the -- main data table where IDs match and output as a recordset. -- This gives us a paged set of records from the main -- data table. SELECT TOP (@row_last-1) * FROM #cache_paging _paging JOIN #cache_primary _primary ON _paging.id_paging = _primary.id WHERE id_row > @row_first
                AND id_row < @row_last

            ORDER BY id_row

    -- Output the paging data as a recordset for use by control code.

        SELECT    @row_count_total    AS row_count_total,
                @param_page_rows        AS page_rows,
                @page_last            AS page_last,
                @row_first            AS row_first,
                @row_last            AS row_last


END
Master table layout and creation. The master table controls all data tables via one to one relationship and carries audit info.
Layout
Column
Type
Description
id
int (Auto Increment)
Primary key for master table. All data tables must include an ID field (NOT auto increment) linked to this field via one to one relationship.
id_group
int
Version linking ID. Multiple entries share an identical group ID to identify them as a single record with multiple versions. If no previous versions of a new record exist, then this column is seeded from ID field after initial creation.
active
bit
If TRUE, marks this entry as the active version of a record. Much faster than a date lookup and necessary for soft delete.
create_by
int
Account creating this version. -1 = Unknown.
create_host
varchar(50)
Host (usually IP provided by control code) creating entry.
create_time
datetype2
Time this entry was created.
create_etime
Computed column
Elapsed time in seconds since entry was created.
update_by
Same as create_x, but updated on every CRUD operation.
update_host
update_time
update_etime
Set Up
CREATE TABLE [dbo].[_a_tbl_master](
	id				int IDENTITY(1,1)	NOT NULL,						-- Primary unique key.
	id_group		int					NULL,							-- Primary record key. All versions of a given record will share a single group ID.
	active			bit					NOT NULL,						-- Is this the active version of a record? TRUE = Yes.
		-- Audit info for creating version. A new
		-- version is created on any CRUD operation
		-- in the data tables controlled by master.
	create_by		int					NOT NULL,						-- Account creating this version. -1 = Unknown.
	create_host		varchar(50)			NOT NULL,						-- Host (usually IP from control code) creating version.
	create_time		datetime2			NOT NULL,						-- Time this version was created.
	create_etime	AS (datediff(second, [create_time], getdate())),	-- Elapsed time in seconds since creation.
		-- Audit information for updating version.
		-- When any CRUD is performed on a data
		-- table, the previously active version
		-- is marked inactive. Deleting a record
		-- simply marks all versions inactive.
		-- In short, the only updates made to
		-- a master table are toggling Active
		-- flag.
	update_by		int					NOT NULL,						-- Account updating this version. -1 = Unknown.
	update_host		varchar(50)			NOT NULL,
	update_time		datetime2			NOT NULL,
	update_etime	AS (datediff(second, update_time, getdate())),

CONSTRAINT PK__a_tbl_master PRIMARY KEY CLUSTERED
(
	id ASC
) WITH (PAD_INDEX = OFF, STATISTICS_NORECOMPUTE = OFF, IGNORE_DUP_KEY = OFF, ALLOW_ROW_LOCKS = ON, ALLOW_PAGE_LOCKS = ON) ON [PRIMARY]
) ON [PRIMARY]

GO

ALTER TABLE _a_tbl_master ADD CONSTRAINT DF__a_tbl_master_active		DEFAULT ((1))			FOR active
GO

ALTER TABLE _a_tbl_master ADD CONSTRAINT DF__a_tbl_master_create_by		DEFAULT ((-1))			FOR create_by
GO

ALTER TABLE _a_tbl_master ADD CONSTRAINT DF__a_tbl_master_create_host	DEFAULT (host_name())	FOR create_host
GO

ALTER TABLE _a_tbl_master ADD CONSTRAINT DF__a_tbl_master_created		DEFAULT (getdate())		FOR create_time
GO

ALTER TABLE _a_tbl_master ADD CONSTRAINT DF__a_tbl_master_update_host	DEFAULT (host_name())	FOR update_host
GO
As part of my ongoing MSSQL Versioning Project, it is often times necessary to pass a list of records to stored procedures, either from the controlling application or from a calling procedure. By use of standardized table design, you will normally only need to pass a list of primary keys. The procedure can query for any other information it needs from that point forward, making it fully self contained more maximum encapsulation.
For the list itself there are several options I know of, but only one is fully viable for my own needs. Your mileage may vary of course:
Delimited List: On the surface this is the simplest of means. Just slap together a comma delimited string (“x, y, z”), break it down at the database console and off you go. If only it were actually that simple, and even if it was there’s not a chance on Earth I’m doing that. Neither should you. This is breaking the law of First Normal Form, something you never want to do for reasons well beyond the scope of this article. If you are curious, several (but by no means all) of the pitfalls of this approach are explained quite nicely here.
Table Valued Parameters: TVPs are extremely powerful when used correctly and have their place, but for purposes of acting as lists or caches in a stored procedure, they have two serious drawbacks.
TVPs are assumed by the query optimizer to contain a single row. This is of little to no consequence if only a few records are involved, but it can be disastrous once a threshold of ~100 is reached. Queries with execution times normally in the millisecond range may suddenly balloon into resource hogs requiring several minutes to complete.
It’s rather unusual, but our environment is WIMP (Windows, IIS, MSSQL, PHP). Connectivity is provided by the sqlsrv driver, with an object oriented wrapper penned by yours truly. Unfortunately at time of writing, this otherwise excellent driver set does not support TVP.
Common Language Runtime: Lots of fun to be had here, but like TVPs, it depends on a very specific environment. Otherwise it simply isn’t applicable. Even when it is, the realities of business often mean taking advantage of CLR adds layers of extra management and time wasted on service requests for the simplest of modifications. No thank you.
XML: This is my method of choice. It’s reasonably fast, only giving up speed to CLR and TVP, and eventually surpassing the later as the number of records increases. It’s also T-SQL compliant, and thus quite portable. The downside is there’s more of a learning curve and you’ll want to design carefully to avoid huge strings. Let’s have a closer look at how…
Considerations
Efficiency: We want the XML itself and parser to be compact and fast as possible.
Scaling: The design should be solid and not break down under a heavy load.
Reuse. We need to encapsulate and standardize our code. It won’t do much good if every query or procedure requires an inline rewrite of the XML parsing.
Implementation
There are three basic scenarios where we will need to parse a list of IDs via XML.
Procedure A executes Procedure B, Sending List of IDs
This will be a common occurrence – in my MSSQL versioning design every procedure that updates data must first update the Master Table. Should sub data be involved, then multiple updates to Master table must first take place – one for each row of sub data updated. First Procedure A will establish the list of records to update as a temp table, as in the following example:
id
created
update_by
update_ip
active
1
2016-12-28
115
128.163.237.37
False
2
2016-12-28
115
128.163.237.37
False
3
2016-12-28
115
128.163.237.37
False
Once the table is ready, this query is run against it:
SET @xml_string_var = (SELECT id FROM <temp table of items to update> FOR XML RAW, ROOT)
The variable @xml_string_var will be populated with an XML string as follows. Note <root> and row. These are default outputs that we could change these by modifying our SQL above, but I prefer to leave them be. Since this little bit of SQL will be in nearly every data update procedure, let’s keep it simple and reusable as possible.
We can now execute Procedure B passing @xml_string_var as an XML string argument.
Procedure B Receives XML From Procedure A
Upon execution, Procedure B will need to break the XML back down into a table. Rather than Procedure B breaking the XML down inline, let’s outsource the work. We could do this with a stored procedure, but the moment we executed a procedure that in turn executed our XML parser, we would run smack into the irritating limitation of nested executions. For those unfamiliar, MSSQL 2008 and below simply do not allow nested stored procedure execution. Any attempted to do so will produce the following error:
Msg 8164, Level 16, State 1, Procedure <procedure_name>, Line <line>An INSERT EXEC statement cannot be nested.
In short, encapsulation as a stored procedure just won’t work. That really just leaves user defined functions. I personally loathe them for a lot of different reasons. They appeal to the programmer in me, but in SQL tend to cause more trouble than they’re worth. Still, if we want to encapsulate the XML parsing (and we DO), a table valued function is the best way to go. We’ll call it tvf_get_id_list:
-- tvf_get_id_list
-- Caskey, Damon V.
-- 2017-01-25
-- Returns recordset of IDs from xml list
--
-- <root>
--		<row id="INT" />
--		...
-- </root>


CREATE FUNCTION tvf_get_id_list (@param_id_list xml)
RETURNS TABLE AS
RETURN (SELECT x.y.value('.','int') AS id
			FROM @param_id_list.nodes('root/row/@id') AS x(y))
Procedure B will call tvf_get_id_list, passing along the XML. The tvf_get_id_list will break the XML down and produce a record-set of IDs, which we can then insert into temp table:
id
1
2
3
Procedure B will now have a access to record set of IDs that it can use to perform whatever work we need done.
As you can see, the XMl parsing work is fairly simple – we specifically planned the XML markup for easy break down. Even so encapsulating the XML work out to a separate function gives us a couple of advantages over just pasting the XML parsing code inline.
Obviously we will use the fastest and best scaled technique for breaking down the XML (see here for examples), but should even better techniques be developed, we only need to modify this one function.
Procedure B and any other procedures that we send our XML list to are simpler and more compact. They need only call tvf_get_id_list to break down the XML list into a usable record set.
Procedure Called By Control Code
This is more or less identical to procedures executing each other, except the procedures are being called by application code. In this case, it is the application’s responsibility to send XML formatted as above. The simplicity of XML makes this rather easy, and the parsing code can be made part of a class file.
The master table controls all data tables in the database, including sub tables containing one to many relational data (ex. One Person -> Many Phone Numbers). This means our master update procedure must be able to handle multiple record updates at once and be modular enough to execute by another update procedure – both for the updating the that procedure’s target data table AND any related sub tables. Otherwise the whole encapsulation concept falls apart.
Populate a temp table with list of update IDs. These are the record IDs that we want modified (or created as the case may be). Ultimately we will be inserting these as new records with new IDs no matter what, but we’ll need to perform versioning if these IDs already exist in the master table.
ID
1
2
3
Find any records in Master Table that match the Update List, and mark them as inactive. They will be replaced with new inserts.
UPDATE
			_a_tbl_master
		SET
			active = 0
		FROM
			#master_update_source _new
		WHERE
			_a_tbl_master.id = _new.id;
Prepare a list of inserts consisting of records where update list and master table IDs math, AND unmatched items in the Update List. The combined list is used to populate a temp table. This is also where we acquire the group ID for existing records. The group ID will be applied to new inserts (versions) of the existing records.
INSERT INTO
			#master_update_inserts (id, id_group, update_by)
		SELECT
			_current.id, _current.id_group, @update_by
		FROM #master_update_source _source
			LEFT JOIN _a_tbl_master _current ON _source.id = _current.id
Apply list of inserts to the Master Table. Use OUTPUT clause to populate a temp table with a list of IDs for each insert.
INSERT INTO
			_a_tbl_master (id_group, update_by)
		OUTPUT
			INSERTED.ID
				INTO #master_update_new_id
		SELECT
			id_group, update_by
		FROM
			#master_update_inserts
Using the list of IDs created when records were inserted to Master Table, we run an UPDATE against Master Table on the list of newly created IDs, where the id_group field is empty. This is to seed new records (not new versions of existing records) with a group ID.
Master Table is now populated. New records will have a group ID identical to their ID, while existing records will have a new ID, but retain their previous group ID.
ID
id_group
created
update_by
update_ip
active
2844
2884
2016-12-28 10:13:45.1900000
115
128.163.237.37
False
2845
2845
2016-12-28 10:13:45.1900000
115
128.163.237.37
False
2846
2846
2016-12-28 10:13:45.1900000
115
128.163.237.37
False
2989
2844
2016-12-28 22:42:14.7930000
115
128.163.237.37
True
2990
2845
2016-12-28 22:42:14.7930000
115
128.163.237.37
True
2991
2846
2016-12-28 22:42:14.7930000
115
128.163.237.37
True
Full procedure (in progress)
-- Caskey, Damon V.
-- 2016-12-20
--
-- Update master table. Must be run before
-- any data table controlled by master is
-- updated. Outputs record set containing
-- IDs for the updated master that a
-- calling data update procedure will need.


SET ANSI_NULLS ON
GO
SET QUOTED_IDENTIFIER ON
GO

ALTER PROCEDURE [dbo].[_a_master_update]

	-- Parameters
	@arg_id					int				= NULL,		-- Primary key.
	@arg_update_by			int				= NULL,		-- ID from account table.
	@arg_update_ip			varchar(50)		= NULL		-- User IP, supplied from application.

AS
BEGIN

	-- Let's create the temp tables we'll need.

		-- List of update requests. All we
		-- need are IDs. The rest is handled
		-- by parameters or generated by
		-- default data binds in the master
		-- table.
		CREATE TABLE #master_update_source
		(
			id			int
		)

		-- Prepared list of items that
		-- will be inserted into the master
		-- table.
		CREATE TABLE #master_update_inserts
		(
			id			int,
			id_group	int
		)

		-- List of new item IDs created when
		-- inserts are perform on master
		-- table.
		CREATE TABLE #master_update_new_id
		(
			id			int
		)


	-- Populate update source (for experiment).
	INSERT INTO #master_update_source (id)
	VALUES (-1), (-1), (2844), (2845), (2846)


	-- Find any records that match our
	-- update list and mark them as inactive.
		UPDATE
			_a_tbl_master
		SET
			active = 0
		FROM
			#master_update_source _new
		WHERE
			_a_tbl_master.id = _new.id;

	-- Prepare inserts. Here we are adding inserts for new
	-- records AND for records that already exist. We do the
	-- later so we can get the current group ID and pass it on.
		INSERT INTO
			#master_update_inserts (id, id_group)
		SELECT
			_current.id, _current.id_group
		FROM #master_update_source _source
			LEFT JOIN _a_tbl_master _current ON _source.id = _current.id

	-- Apply the insert list (insert into master table). New
	-- IDs created by the database are output into
	-- a temp table.
		INSERT INTO
			_a_tbl_master (id_group, update_by, update_ip)
		OUTPUT
			INSERTED.ID
				INTO #master_update_new_id
		SELECT
			id_group, @arg_update_by, @arg_update_ip
		FROM
			#master_update_inserts

	-- For new records, seed the group ID with
	-- new record's ID.
		UPDATE
			_a_tbl_master
		SET
			id_group = _new.id
		FROM
			#master_update_new_id _new
		WHERE
			_a_tbl_master.id = _new.id AND _a_tbl_master.id_group IS NULL;

END
Notes from 2016-11-26 – Revamping OpenBOR collision detection.
With the possibility of several dozen or more entities on screen, collision detection must be precise with minimal resource intensity.
Currently coordinates (s_hitbox) exist as static sub-structures in s_collision_attack and s_collision_body. See below…
typedef struct
{
	int x;
	int y;
	int width;
	int height;
	int z1;
	int z2;
} s_hitbox;

// s_collision_attack
typedef struct
{
    int                 attack_drop;        // now be a knock-down factor, how many this attack will knock victim down
    int                 attack_force;
    int                 attack_type;        // Reaction animation, death, etc.
    int                 blast;              // Attack box active on hit opponent's fall animation.
    int                 blockflash;         // Custom bflash for each animation, model id
    int                 blocksound;         // Custom sound for when an attack is blocked
    s_hitbox            coords;
    int                 counterattack;      // Treat other attack boxes as body box.
    ...
This was done for simplicity, and with current logic wastes no memory as coordinates are always required for a collision box.
However, the addition of multiple collision box support has exposed the need to break collision detection down into smaller functions. This in turn requires a lot of passing around the entire s_hitbox structure. Given the rate this functionality is used (multiple collision evaluations on every entity on every animation frame @200 frames per second), efficiency is absolutely imperative. Replacing the static coords declaration with a pointer and using dynamic allocation will add some code complexity initially, but in the long term should simplify breaking down collision logic and save substantial resources.
The following are in progress logic functions, they will need reworking to accommodate new pointer.
// Caskey, Damon V.
// 2016-11-25
//
// Get 2D size and position of collision box.
s_coords_box_2D collision_final_coords_2D(entity *entity, s_hitbox coords)
{
    s_hitbox        temp;
    s_coords_box_2D result;

    temp.z1 = 0;

    // If Z coords are reversed, let's correct them.
    // Otherwise we use
    if(coords.z2 > coords.z1)
    {
        temp.z1 = coords.z1 + (coords.z2 - coords.z1) / 2;
    }

    // Get entity positions with Z offset
    // included, and cast to integer.
    temp.x    = (int)(entity->position.x);
    temp.y    = (int)(temp.z1 - entity->position.y);

    // Use temporary positions to get final dimensions
    // for collision boxes.
    if(entity->direction == DIRECTION_LEFT)
    {
        result.position.x   = temp.x - coords.width;
        result.size.x       = temp.x - coords.x;
    }
    else
    {
        result.position.x   = temp.x + coords.x;
        result.size.x       = temp.x + coords.width;
    }
    result.position.y   = temp.y + coords.y;
    result.size.y       = temp.y + coords_owner.height;

    return result;
}

bool collision_check_contact_2D(s_coords_box_2D owner, s_coords_box_2D target)
{
    // Compare the calculated boxes. If any one check
    // fails, then the boxes are not in contact.
    if(owner.position.x > target.size.x)
    {
        return FALSE;
    }
    if(target.position.x > target.size.x)
    {
        return FALSE;
    }
    if(owner.position.y > target.size.y)
    {
        return FALSE;
    }
    if(target.position.y > target.size.y)
    {
        return FALSE;
    }
}

bool collision_check_contact_Z(entity *owner, s_hitbox coords_owner, s_hitbox coords_target)
{
    int Z_distance = 0;
    int z1 = 0;
    int z2 = 0;

    if(coords_owner.z2 > coords_owner.z1)
    {
        z1 += coords_owner.z1 + (coords_owner.z2 - coords_owner.z1) / 2;
        zdist = (coords_owner.z2 - coords_owner.z1) / 2;
    }
    else if(coords_owner.z1)
    {
        zdist += coords_owner.z1;
    }
    else
    {
        zdist += attacker->modeldata.grabdistance / 3 + 1;    //temporay fix for integer to float conversion
    }

    if(coords_target.z2 > coords_target.z1)
    {
        z2 += coords_target.z1 + (coords_target.z2 - coords_target.z1) / 2;
        zdist += (coords_target.z2 - coords_target.z1) / 2;
    }
    else if(coords_target.z1)
    {
        zdist += coords_target.z1;
    }

    zdist++; // pass >= <= check if(diff(z1, z2) > zdist)
    {
        return FALSE;
    }

    return TRUE;
}

// Caskey, Damon V.
// 2016-11-25
//
// Compare collision boxes and return
// TRUE if they are in contact.
bool checkhit_collision(entity *owner, entity *target, s_hitbox coords_owner, s_hitbox coords_target)
{
    s_coords_box_2D owner_final;
    s_coords_box_2D target_final;

    bool result;

    // First check Z contact.
    result = collision_check_contact_Z(owner, coords_owner, coords_target);

    // If result is TRUE, then run
    // 2D plane checks.
    if(result)
    {
        // Get final collision box 2D plane sizes.
        owner_final     = collision_final_coords_2D(owner, coords_owner);
        target_final    = collision_final_coords_2D(target, coords_target);

        // Compare the 2D boxes and get result.
        result = collision_check_contact_2D(owner_final, target_final);
    }

    // return final result.
    return result;
}

// Find center of attack area
s_axis_f_2d collision_center()
{

    leftleast = attack_pos_x;

    if(leftleast < detect_pos_x) { leftleast = detect_pos_x; } rightleast = attack_size_x; if(rightleast > detect_size_x)
    {
        rightleast = detect_size_x;
    }

    medx = (float)(leftleast + rightleast) / 2;
}
Back Kick button is removed. New button Defend replaces it.
Punch and Kick are renamed “Attack A” and “Attack B” as their functions differ depending on which Lee brother is used.
New Moves
Block.
Run.
Somersault Throw.
Somersault Kick.
Backdrop Finisher.
Hyper Uppercut.
Hyper Knee.
Dragon’s Tail Kick (Double team jump kick).
Double Dragon Hurricane Kick (Double team Hurricane Kick).
Rear Backhand Strike (w/sticks).
TKD Kick.
TKD Finisher.
Knee Thrust.
Middle kick (Grab finisher).
Roundhouse Kick finisher.
Modified Moves
Hurricane kick now requires timing with apex of jump as in the original arcade DDII, but is also more powerful.
Stick combo is now a faster four step combo with all unique animations, and hit per button press. Take away Chin’s Kali sticks and show him how it’s done!
Second strike with chains and whips now has a unique animation.
Off wall kick has new animation.
Stages
All
Updated music to Double Dragon Neon tracks with offsets & loops.
Stage 1 (City)
Separated background.
Path
Bush
City
Sky
Upgrade to .png assets. ~73kb vs. ~279kb
State 3A (Rooftops)
Bridge is now a metallic grate – scenery visible through the bottom
Separated background.
Path
Forrest
City
Mountains
Clouds
Sky
Upgrade to .png assets. ~136kb vs. ~718kb
Stage 3 (Forrest)
Separated background.
Path
Trees
Field
Mountains
Clouds (Clouds consist of four independent layers auto scrolling at different rates to simulate real flowing cloud cover)
Sky
Upgrade to .png assets. ~166kb vs ~615kb
Stage 4 (Invade the enemy base!)
Separated background.
Path
Tree (black)
Trees (blue)
Sky
Upgrade to .png assets. ~322kb vs. ~1478kb
Technical
Where possible, rework some scripts with #import rather than #include. This is a huge memory saver.
Refine billkey.c with marcos and bitwise operators.
Jump animations simplified.
Jump animations formerly included multiple identical frames to control the timing for cancels. These have been replaced by velocity evaluation in keyscripts. The extra frames are removed.
Eliminate unneeded resources
Billy’s weapon sprites that were identical to unarmed version. References in weapon texts switched to the unarmed sprite. Note that small item weapon sprites were unique, but unnecessary and were also eliminated. Small items are normally in the far hand while walking and would be completely hidden from view – the armed versions magically switch item to near hand. Makes more sense to simply use the unarmed sprites.
A childhood friend of mine who teaches vocational electric and electronics started his MAME cabinet a while back, and is now nearing completion. What sets it apart from most are the constituents and craftsmanship. I’ve seen plenty of setups that had nice sticks, screens, and whatnot, but the cabinets themselves tend to be a bit thrown together. Not here.
This subject is being constructed ground up with high quality materials, precise cuts, and exquisite attention to detail. Assuming that’s still the case, he has also enlisted yours truly to do the artwork when assembly is complete.
60mm competition sticks
Retractable castors
Custom cut marque with rotating color back-lighting
Coin door on order (pay to play, lol)
IIRC it’s powered by a solid state terminal with 1080p plasma monitor, but in any case it has hinged component access and pull out drawers for quick swapping.
The downside is quality takes time – but when finished this thing will be a beast. Who’s up for a whoopin’ at Samurai Shodown II?
Integer to GUID conversion notes for Inspector Blair project.
Grouping feature requires GUID in place of Integer values for IDs. I would prefer not to perform this conversion for the following reasons:
It represents a lot of work for absolutely no visual progress to internal customers.
GUID IDs are X*16 per record compared to integer values. This obvious exponential increase represents a larger load on the database server, but more importantly, means far more HTML code being sent for each page. The extra load is utterly negligible to our network and servers, but could impact mobile devices. <option value = “BC072ADE-ACBF-42B0-8FCA-5587E0FE95BC”>Inspector – Biosafety</option> <option value=”1”>Inspector – Biosafety</option>
While I don’t believe switching to GUID will impact performance to a noticeable degree, I had still hoped to use integers for absolute maximum speed. However, in order to add grouping and integrate it with lists of individuals, GUIDS are an absolute must. Following steps were taken to convert account records to GUID. These same steps may be applied to inspections, system log, autoclaves, and buildings.
Rename integer ID field to “ID_old”.
Create new Unique Identifier (Guid) field named “ID”.
Set Rowguid = True
Ensure default data binding is (newid())
If table is not part of a relationship, set “id” to primary key.
If table is part of any relationship perform the following:
Rename Integer “FK_ID” to “FK_ID_OLD” in child table.
Create new Unique Identifier (Guid) field named “FK_ID” in child table.
Set Rowguid = True
Run following query:
UPDATE _sub SET _sub.fk_id = _main.id FROM parent _main, child _sub WHERE _sub.fk_id.old = _main.id_old
Delete one (ID_OLD) to many (FK_ID_OLD) relationship of between parent and child table.
Set “ID” field in parent and children tables to primary key.
Create new one (ID) to many (FK_ID) relationship between parent and child table.
Primary key table: ID, Foreign key table: FK_ID
INSERT AND UPDATE, Delete Rule: Cascade
INSERT AND UPDATE, Update Rule: Cascade
Retype all @id variables in stored procedures from “int” to “uniqueidentifier”.
Retype all INT values in xml variables to “uniqueidentifier”.
If table is a list for selected items, (ex. Account roles), the relevant field must be converted to GUID as well. No notes available, use query similar to parent and child.
For detail display (opposed to data list pages), perform the following additional steps.
Modify the detail output stored procedure as follows. See “dbo.account” stored procedure for example.
Replace primary table variable (<@tempMain>) with temp table (<#primary_cache>). This does not change functionality but will increase performance.
Navigation queries can no longer use output variables. Instead, all relevant output data for navigation should now be output as the first record set.
If the ID is not provided, run a SELECT TOP 1 query to pre populate.
Modify display page as follows. See “account.php” for example.
Remove all navigation variables from stored procedure call and the associated navigation variables.
Insert recordset read, and place resulting values directly into navigation object. Navigation is the first record set.
Make sure to add “$query->get_next_result();” for main data recordset read immediately below.
If detail view contains sub data, remove array verification in sub table update code.
Add array verification in the xml() method of the relevant data’s class file.
Add <script> url reference to “dc_guid” function.
In all insert functions, add a single string variable populated from “dc_guid” function. Replace all $temp_int references with this new variable.\
Remove global $temp_int.
Test detail page.
Create new record.
Update record.
Create sub record.
Update sub record.
Delete sub record.
Delete record.
Navigation
Verify list pages point to correct entry in detail page.
Multiple stage layer example with OpenBOR. See gallery below for stage broken into its individual resources.
This stage is comprised of eight layers. See text for description of each.
From front to back:
Posts are the default OpenBOR front panel.
Palm fronds are a panel type entity to allow wafting animation.
Layer: 100
Speed: -0.25
Play field is the default OpenBOR panel.
Boat is an animated singular obstacle type entity. It is fully animated and has collision enabled. It can thus be hit and ultimately sunk, but only by throwing enemy characters out of the play field (more on that later).
Layer: -8
Scroll: 0.17
Bay and nearest area of the city are made from a series of panel type entities. This is to allow animation of the various city elements and gleaming water.
Layer: -10
Speed: 0.2
A second series of panel type entities creates another layer of water and city area for smoother scrolling.
Layer: -11
Speed: 0.3
A third and final layer of panel type entities comprises the furthest visible water.
Layer: -12
Speed: 0.4
Background is OpenBOR’s default background, set to autoscroll mode so the clouds are always rolling by.
Bgspeed: 1 0
With eight independently scrolling layers, the visual effect is that of near 3D scrolling when characters traverse the stage. A final touch is an invisible entity resetting the stage palette to the next of ten increasingly darker and redder hues every thirty seconds of real time. This creates a sunset effect during game play.
DC’s Object Core Library is an effort to bring some of the benefits of object oriented programing to the OpenBOR script engine. Although it is technically impossible to define a true object through OpenBOR script, careful structuring of functions into methods properties allows us to closely simulate OOP behavior.
Encapsulation
Re-usability
Forward compatibility
Simplicity
Expandability
The DC Damage Library coves a fundamental building block; damaging entities. After all, there is little use in something like a bind/grappling system without the means to apply damage. It is very important to not only damage entities using the engine’s built in damage system, but to do so in a controlled way. You will find this system allows you near infinite combinations of settings to cover almost any damage needs.
You can always put it elsewhere, but if you do, you’ll need to modify all the #include and #imports accordingly.
Add the line #include “data/scripts/dc_damage/main.c” to any scripts you’d like to use damage objects in, and you’re ready to go.
Use
In its most basic form, there are exactly three steps once you’ve installed the DC Damage Object.
Initialize an object. To do that, call dc_damage_create_object({index}). The {index} is a required integer value of your choosing. You can have as many damage objects as you like, {index} identifies which is which. Once initialized an object can used by any script that you installed the library to.
Now you need to define a target to damage. That’s easy too; call dc_damage_set_target({index}, {entity}) and make whatever entity you want to damage.
Now all you need to do is call damage_execute({index}) and your target gets nailed!
frame chars/dude/sprite1.png
    @cmd dc_damage_create_object 0 #Let's create an object with index of 0.
    @cmd dc_damage_create_object 0 findtarget(getlocalvar("self)) #Set the target to be the nearest enemy.
frame chars/dude/sprite2.png
frame chars/dude/sprite3.png
frame chars/dude/sprite20.png
     @cmd dc_damage_execute 0 #Apply damage the target of damage object 0.
frame chars/dude/sprite22.png
Now here’s where it gets interesting. If you do nothing else but the three steps above, you get a simple knockdown with 0 damage. Not all that exciting. But that’s because you applied damage without setting any properties other than the target. So now you’ll want to work with the other properties to crate different effects. The amount of force, knockdown, how far, which direction, and so on are all adjustable on the fly. Just call the relevant mutator function (see below for list) with the index and you desired value. Only worry about the properties you need to – the rest have defaults (you can change these defaults if you like, see Advanced Use). There’s even a set of constants provided to help you along.
Damage a target, change some settings, damage it again. Multiple objects can be used all it once, it really doesn’t matter.
Action Methods
These methods are used to execute basic actions.
void damage_create_object(int index): Create a damage object identified by and populate with default values. Object is then ready to use, but you will need to set a target before applying damage.
void damage_destroy_object(int index): Destroy the object and free up resources.
void damage_execute(int index): Apply damage effects to target. You must first set a target. If there is no target set, an alert will be sent to the log and no further action will be taken.
void damage_ dump_object(int index): Send all object properties to the log.
void damage_import_object(int index, void object): Import all properties from a another damage object to . Will create new object or overwrite existing as needed.
Access Methods
Get object properties and status values. Unless noted otherwise, see the corresponding mutate method descriptions for property details.
void entity = damage_get_attacker(int index): Get the damaging entity.
int atk = damage_get_attacking(int index): Get attacking property.
int dir = damage_get_direction_adjustment(int index): Get direction adjustment property.
int dol = damage_get_dol_force(int index): Get damage on landing force property.
int drop = damage_get_drop(int index): Get drop power property.
int force = damage_get_force(int index): Get force property.
int force = damage_get_force_mitigated(int index): Get the damage target would receive after its defense and attacker’s offense are applied.
int force = damage_get_force_final(int index): Get force that target will receive after all damage mitigation and object settings are applied.
int min = damage_get_hp_cap_min(int index): Get target HP cap minimum property.
void obj = damage_get_object(int index): Get object array. Useful to copy object or save into global for game persistence.
int proj = damage_get_projectile(int index): Get projectile property.
int type = damage_get_type(int index): Get attack type property.
int flip = damage_get_velocity_flip_x(int index): Get X velocity flipping property.
float X = damage_get_velocity_x(int index): Get X drop velocity.
float Y = damage_get_velocity_y(int index): Get Y drop velocity.
float Z = damage_get_velocity_z(int index): Get Z drop velocity.
Mutate Methods
Establish and change object properties. Where applicable default values for the property are listed.
void damage_set_attacker(int index, void value = NULL()): Set entity that will cause damage and receive credit for doing so. If no attacker is set when damage is applied, the target itself will be considered the attacker.
void damage_set_attacking(int index, int value = DC_DAMAGE_FALSE): Toggle the target’s attacking flag when damage is applied. Combine with projectile to create a blast effect. Uses general Boolean constants:
DC_DAMAGE_TRUE: Target’s attacking flag will be turned on.
DC_DAMAGE_FALSE: Target’s attacking flag will be turned off.
void damage_set_direction_adjustment(int index, int value = DC_DAMAGE_DIR_ADJ_OPP): Determines how target’s direction will be adjusted when damage is applied. Use with following constants:
DC_DAMAGE_DIR_ADJ_LEFT: Target will always face left.
DC_DAMAGE_DIR_ADJ_OPP: Target will always face opposite direction of attacker.
DC_DAMAGE_DIR_ADJ_NONE: Target’s facing will not be adjusted.
DC_DAMAGE_DIR_ADJ_SAME: Target will always face same direction as attacker.
DC_DAMAGE_DIR_ADJ_SAME: Target will always face right.
void damage_set_dol_force(int index, int value = 0): Damage target will receive upon landing from fall. May be mitigated by target’s defenses or ability to land.
void damage_set_drop(int index, int value = 1): Drop (knockdown) power that will be applied to target with damage.
void damage_set_type(int index, int value = openborconstant(“ATK_NORMAL”)): Type of damage that will be applied to target.
void damage_set_force(int index, float value = 0): Quantity of damage that will be applied to target. Float types are only accepted for future expansion. The engine will truncate any decimal value when damage is applied.
void damage_set_hp_cap_min(int index, int value = 0): Target’s minimum allowed hitpoints after damage is applied. If after mitigated force will drop target’s HP to at or below , applied force will be adjusted as necessary to allow target’s HP to stay at minimum.
void damage_set_projectile(int index, int value = DC_DAMAGE_FALSE): Toogle target’s projectile flag when damage is applied.
DC_DAMAGE_TRUE: Target’s projectile flag is turned on.
DC_DAMAGE_FALSE: Target’s projectile flag is turned off
void damage_set_target(int index, void value = NULL()): Set target entity to damage. You must set a target before applying damage.
void damage_set_velocity_flip_x(int index, float value = DC_DAMAGE_VEL_FLIP_X_AWAY): Toggle mirroring of X drop velocity when damage is applied.
DC_DAMAGE_VEL_FLIP_X_AWAY: Always send target away from attacker.
DC_DAMAGE_VEL_FLIP_X_OPP_ATK: Always send target opposite direction of attacker’s facing.
DC_DAMAGE_VEL_FLIP_X_OPP_TARGET: Always send target opposite its own facing.
DC_DAMAGE_VEL_FLIP_X_NONE: Apply X drop velocity as is.
DC_DAMAGE_VEL_FLIP_X_SAME_ATK: Always send target same direction of attacker’s facing.
DC_DAMAGE_VEL_FLIP_X_SAME_TARGET: Always send target same direction as its own facing.
void damage_set_velocity_x(int index, float value = 1.2): X axis velocity applied to target on knockdown.
void damage_set_velocity_y(int index, float value = 3): Y axis velocity applied to target on knockdown.
void damage_set_velocity_z(int index, float value = 0): Z axis velocity applied to target on knockdown.
Advanced Use
Efficiency notes:
The installation #include is merely to start a file chain of #imports. The only items truly being #included are constants.
Objects are actually arrays stored as an index var. Therefore each defined object requires only one indexed var.
Because the library is written to behave like an object, it can be easily extended like an object class. Add your own goodies, just make sure to follow the interface rules for forward compatibility and try not to get carried away. Remember this is an “object” and should remained specialized. Things like flash spawns, sound effects and such are the purview of other object libraries (which will be coming soon).
Settings.h allows readjusting of object behavior as needed.
Array keys
Indexed var keys
Default properties
To Do
Clean up some of the calculation formulas. A few of them are pretty crude.
% based damage option.
Maximum option for HP cap.
Min/max damage caps.
No reflect option (currently not available in OpenBOR script).
Looking for native enumeration with PHP? Sadly you are out of luck. PHP simply does not support enumeration out of the box. Fortunately though you do have some options. Each one has its attributes and shortcomings based upon your needs.
splEnum: This is an experimental PHP extension that will provide enumeration that’s as close to native support as you’re going to get. Because it requires installing additional files to work, it is not a good solution unless you have full server control. Personally I avoid this approach at all costs. I prefer clean installs of PHP. Also, depending on extensions makes your code non portable.
Custom class: There are a lot of great enumeration classes out there, or you could always write one from scratch. Marijan Šuflaj has written an excellent version available for use here. The primary disadvantage is complexity. Even using a pre-made class the instantiation and function calls are sometimes just not worth it when all you need is a straight forward list of enumerated values.
The third option: Leverage abstract classes to create an encapsulated list. This is the simplest route and what I shall be demonstrating here.
Creating a value list really is a simple affair with PHP. All you need is to craft an abstract class and define a group of constants within it. Abstract classes cannot be instantiated as objects, but their members are immediately available for referencing.
Here is an example for calendar months.
// Set up a list of months.
abstract class MONTH
{
	const
		JANUARY		= 1,
		FEBRUARY	= 2,
		MARCH		= 3,
		APRIL		= 4,
		MAY		    = 5,
		JUNE		= 6,
		JULY		= 7,
		AUGUST		= 8,
		SEPTEMBER	= 9,
		OCTOBER		= 10,
		NOVEMBER	= 11,
		DECEMBER	= 12;
}

// Now echo a value.
echo MONTH::APRIL;
That’s really all there is to it! Sure, this isn’t true enumeration. You must still key in values. Plus there’s no error checking or type hinting for switch operations and similar ilk as you’d find in a compiled language. What you do get is a simple list with encapsulation and list type hinting from the IDE. All with minimal code. Keeping the global namespace clean alone is a fantastic benefit.
A few keystrokes and your IDE springs to action.
For most rudimentary enumeration needs this should prove more than sufficient, at least until the fine folks at PHP step up and provide us with the real thing.
Here’s an easy one, but sometimes still troublesome for individuals testing the waters of SQL: How to quickly copy a table. There are lots of cases where you need to duplicate a table in all but name. Maybe you want the data as well, maybe not. Unfortunately this seemingly simple task is lacking as a functionality in most development tools – including the big boys like MS SQL Server Management Studio.
The good news is there’s a perfectly logical reason such a feature isn’t apparent: It’s part of SQL already, and super simple to boot. Here’s what to do:
SELECT * INTO schema.new_table FROM schema.existing_table
Execute this as a query and voila! You now have a duplicate of the old table, complete with data. Want to make a copy sans data? Just query for a non existent key value.
SELECT * INTO schema.new_table FROM schema.existing_table WHERE some_field = non_existing_value
It’s really that simple. No plug ins or complex write ups required.
Extra Credit
You needn’t copy every field. Swap out * with a list of desired fields, just like any other query.
Play with the WHERE cause a bit and you can copy portions of data rather than all or nothing. Again, to your SQL engine it’s just another query, so use your imagination.